Bead Hoarders Blog Hop: Serengeti Necklace

Bead_Hoarders_Blog_Hop
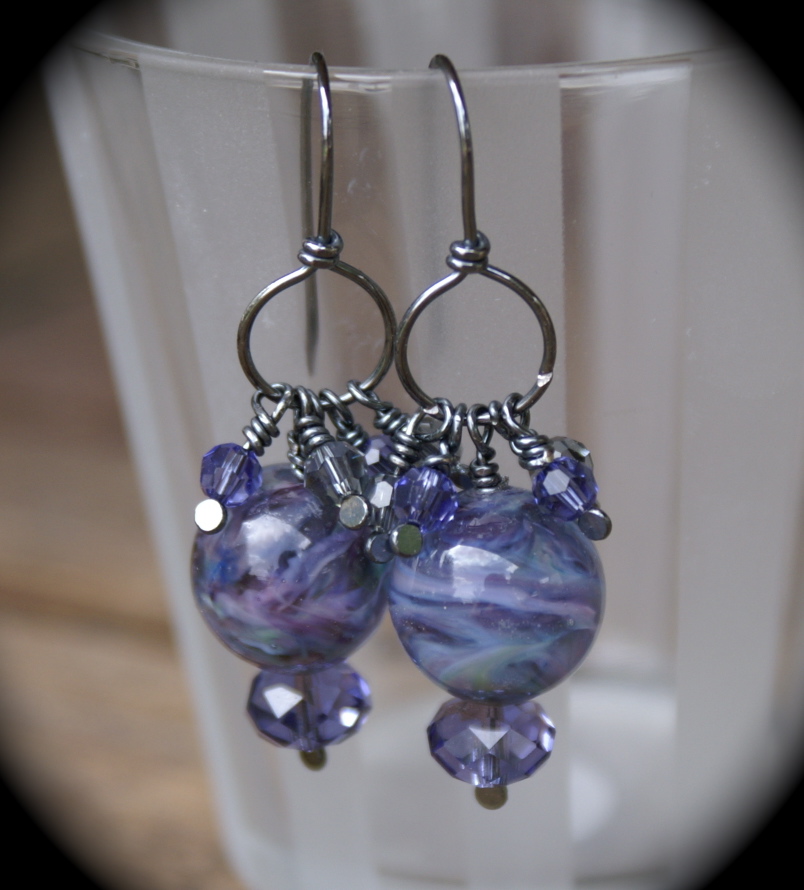
Today, beads long buried are born to treasure. One hundred sixty-five artists and crafters joined the challenge to finally use those beads we keep tucked away. You see, beaders are a bit like dragons…we like to hoard treasure. But Lori over at Pretty Things knows that the only thing better than hoarding your favorite beads is sharing them! So, welcome to Lori Anderson’s Bead Hoarders Blog Hop.

serengeti necklace by rlc

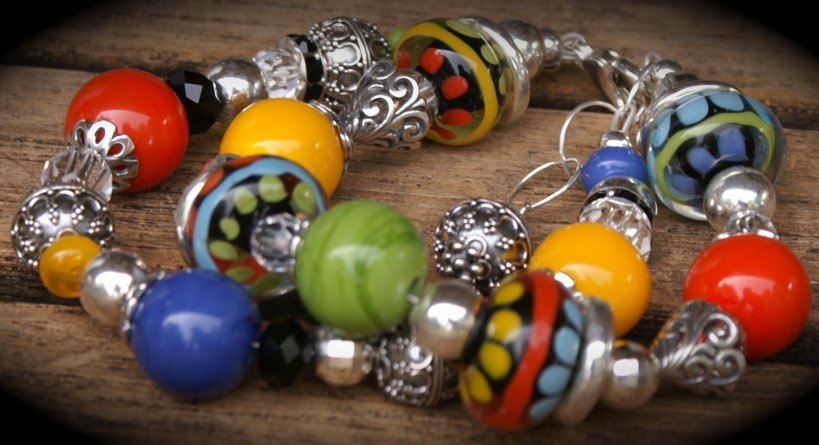
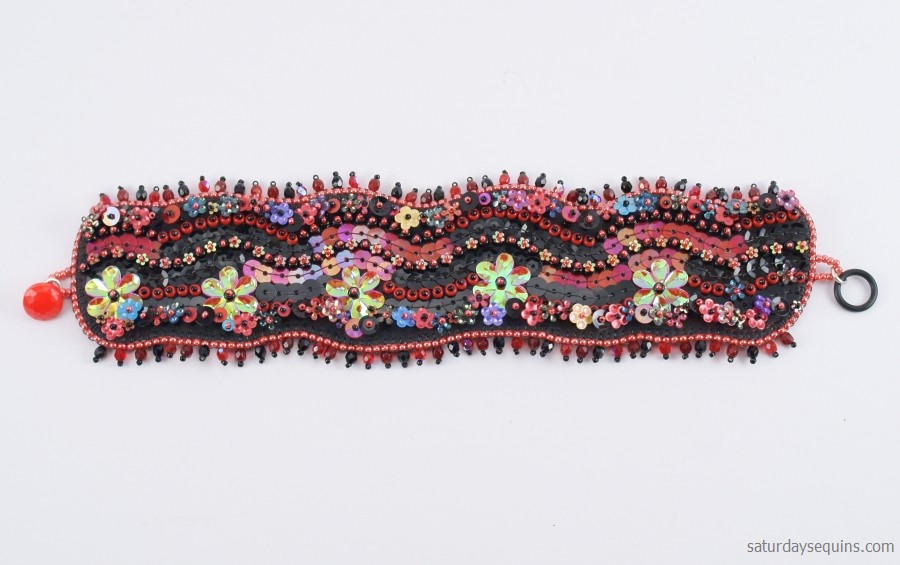
My Serengeti Necklace started with a few beads purchased several years ago at The Bead Museum in Glendale, Arizona. I’ve played with various designs for them but nothing really clicked until I was given a bag of tree bark. Finally, this elephant has a home!

(No ivory was used in this piece; the pale beads are resin. The little brown, round beads are some type of seed. )

Want to see more treasure? You’re sure to see some beautiful creations by the following artists!

  1. Lori Anderson, Pretty Things
  2. Nancy Dale, NEDBeads
  3. Roxanne Mendoza, Roxi Designs
  4. Melissa Trudinger, beadrecipes
  5. Rana Lea, Rana Lea Designs
  6. Perri Jackson, Shaktipaj Designs
  7. Rita Avila, Jewel School Friends
  8. Linda Anderson, From the Bead Board
  9. ?
  10. 10.  Erin Guest, Renlish

11.  Joan Williams, lilruby jewelry
12. Diane Hawkey, Diane Hawkey
13.  Jo-Ann Woolverton, It’s a Beadiful Creation
14.  Sue Kennedy, SueBeads
15.  Lisa Cone, Inspired Adornments
16.  Kari Asbury, Hippie Chick Design
17.  Nichole Byers, Nichole Byers
18.  Lori Jean Poppe, Adventures in Creativity
19.  Linda Landig, Linda’s Bead Blog and Meanderings
20.  Lori Schneider, Bead Addict

21.  Molly Alexander, Beautifully Broken Me
22.  Cece Cormier, The Beading Yogini
23.  Niki Sayers, Silver Nik Nats
24.  Elsie Deliz-Fonseca, Eliz-Eliz and All That Craft
25.  Amber Dawn, Inventive Soul
26.  Heather Powers, Humblebeads
27.  Sarah Goode, Pookledo
28.  Monique Urquhart, A Half-Baked Notion
29.  JJ Jacobs, Coming Abstractions
30.  Cheri Reed, Creative Designs by Cheri

31.  Robyn at Museiddity–You Are Here
32.  Catherine King, Catherine’s Musings
33.  Jacquie, Bead Gypsy
34.  Janet McDonald, Singing Woods
35.  Kay Thomerson, Kayz Kreations
36.  Tanty Sri Hartanti, TJewellicious by Tanti
37.  Hannah Rosner, Good River Valley
38.  Rochelle Brisson, A Creative Chelle
39.  Nelly May, Smelly Nelly
40.  Skylar Bre’z, Brising Beads

41.  Beti Horvath, Stringing Fool
42.  Christie Murrow, Charis Designs
43.  Leanne Loftus, First Impression Design
44.  Valerie Norton, Hot Art
45.  Judy Riggs, Rigglettes
46.  Crystal Thain, Here Bead Dragons
47.  Terry Carter,  Tapping Flamingo
48.  Sue, Mid-Life Great Expectations
49.  Nan Smith, Wired Nan
50.  Miranda Ackerley, MirandAck Arts

51.  Marie Covert, Creating Interest
52.  D’Arsie Manzella, This Here Now, Mamacita
53.  Stephanie Haussler, Pixybug Designs
54.  Lori Bergmann, Lori Bergmann Design
55.  Johanna Nunez, The Lovely One Design
56.  Mary Govaars, MLH Jewelry Designs
57.  Becky Pancake, Becky Pancake Bead Designs
58.  Alicia Marinache, All the Pretty Things
59.  Debbie Rasmussen, A Little of This, A Little of That
60.  Nat, Grubbi Ceramics

61.  Marjorie Savill Linthwaite, Bennu Bird Rising
62.  Cheryl McCloud, One Thing Leads to Another
63.  Heather Otto, The Crafthopper
64.  Candida Castleberry, Spun Sugar Beadworks
65.  Tracie Dean, Dean Designs
66.  JuLee Wolfe, The Polymer Penguin
67.  Ginger Bishop, Lil Mummy Likes
68.  Karen Mitchell, Over the Moon Design
69.  Jeannie Dukic, Jeannie’s Blog
70.  Dini Bruinsma, Angaza by Changes

71.  Birgitta Lejonklou, Create With Spirit
72.  Shalini Austin, Jewellery by Shalini
73.  Jayne Capps, Mama’s Got to Doodle
74.  Ile Ruzza, Ilenia’s Unique Beaded Jewelry

75. ?
76.  Annita Wilson, AW Jewelry 
77.  Sherri Stokey, Knot Just Macrame
78.  Hannah Trost, PZ Designs
79.  Linda Inhelder, Must Haves Jewelry
80.  Miri Agassi, Beadwork

81.  Hope Smitherman, Crafty Hope
82.  Dyanne Cantrell, Dee-Liteful Jewelry Creations
83.  Susan Bowie, Susan Nelson Bowie
84.  Megan Milliken, MaeMaeMills
85.  Menka Gupta, Menka’s Jewelry
86.  Ambra Gostoli, Chic and Frog
87.  Lori Lochner, Bloghner
88.  Gerda Jurimae, Gerda’s Crafts Blog
89.  Susan, Mistheword
90.  MaryLou Holvenstot, MaryLou’s time2cre8

91.  Mary Shannon Hicks, falling into the sky
92.  Karin King, The Sparklie Things Blog
93.  Christa Murphy, Adventures of One Beady Woman
94.  Jenny Davie-Reazor, Jenny Davies-Reazor
95.  Donetta Farrington, Simply Gorgeous
96.  Mallory Hoffman, Rosebud 101 – For the Love of Beads
97.  Danielle Kelley, Imbue the Muse
98.  Kym Hunter, Kym Hunter Designs
99.  Dolores Rami, CraftyD’s Creations
100.  Marcia Dunne, 13 Alternatives

101.  Marlene Cupo, Amazing Designs
102.  Emma Todd, A Polymer Penchant
103.  Wendy Holder, Jewelry by WendyLea
104.  Michelle Escano, The Cabby Crafter
105.  Louise Glazier, Lily and Jasmine Treasures
106.  Dana Hickey, Wind Dancer Studios
107.  Lennis Carter, windbent
108.  Anne Betenson, Crystal River Beads
109.  Audrey Belanger,  Dreams of an Absolution
110.  Lisa Stukel, Carefree Jewelry by Lisa

111.  Janine Lucas, Travel Stories
112.  Claire Lockwood, Something to Do With Your Hands
113.  Kathy Engstrom, Catherine’s Dreams
114.  Paula Hisel, Simply Beadiful
115.  Karla Morgan, Texas Pepper Jams
116.  Mischelle Fanucchi, Micheladas Musings
117.  Kim, Cianci Blue
118.  Linda Sadler, Ida Louise Jewelry
119.  Karen, Spokalulu
120.  Jennifer LaVite, Dry Gulch Bead and Jewelry

121.  Andrea Glick-Zenith, ZenithJade Creations
122.  Karen Martinez, Fairies Market
123.  Robin Reed, Artistry HCBD
124.  Amy Bright, LABweorc
125.  Jasvanti Patel, Jewels by Jasvanti
126.  Tammie Everly, TTE Designs
127.  Karin Slaton, Backstory Beads
128.  Natalie Moten, Running Out of Thread
129.  Sharyl McMillian-Nelson, Sharyl’s Jewelry & Reflections
130.  Jenny Kyrlach, Wonder and Whimsy

131.  LiliKrist, Handmade by LilK
132.  Jessica Klaaren, The Truth Space
133.  Cynthia Abner, Created Treasures
134.  Beth Emery, Stories by Indigo Heart
135.  Heather Davis, Blissful Garden Beads
136.  Jeanne, Gems by Jeanne Marie
137.  Sandi Volpe, Sandi Volpe
138.  Laren Dee Barton, Laren Dee Designs
139.  Steph, Confessions of a Bead Hoarder
140.  Carolyn Lawson, Carolyn’s Creations

141.  B. R. Kuhlman, Mixed Mayhem
142.  Patty Miller, Cabari Beads
143.  Elizabeth Bunn, Elizabeth Beads
144.  Marianna Boylan, Pretty Shiny Things
145.  Lizzie Clarke, The Need to Bead
146.  Christina Miles, Wings ‘n’ Scales
147.  Patricia, The Color of Dreams
148.  Marde Lowe, Fancimar
149.  Ev Shelby, Raindrop Creations
150.  Sarah Small, By Salla

151.  Perri Jackson, Shaktipaj Designs
152.  Laurie Vyselaar, Lefthand Jewelry
153.  Pam Traub, Klassy Joolz
154.  Lisa Harrison, Daisy Meadow Studio
155.  Anzia Parks, Anzi-Panzi’s Work Shoppe
156.  Ingrid, Lilisgems Handcrafted Jewelry Inspirations
157.  Andra Weber, Andra’s Joyful Journey
158.  Kelly Hosford Patterson, The Traveling Side Show
159.  Adlinah Kamsir, Dreamstruck Designs
160.  Marci, That Nothing Be Wasted

161.  Kris Lanae Binsfield,  Cherish Designs
162.  Stephanie Perry, Mustard Bead
163.  Birgit Klughardt, Gites Beads
164.  Inge von Roos, Inge’s Blog
165.  Rebecca Sirevaag, Becca’s Place
166.  Sandy Markley, Gypsy Spirit Designs
167.  Elena Adams, Lena’s Beady Blog

(Note: The Bead Museum is no longer in Arizona. They say the collection moved to Mingei International Museum in San Diego.)

Advertisement

Creative Spotlight: Haley Smith, Glass Bead Artist and Owner of BuckleBottom Beads

At The Torch with Haley SmithMuseiddity: Hi Haley, I’m so glad you could join us today!

How did you get involved in lampworking?

Haley: Oh, that’s easy. I was bored. Ha! Seriously, though. I was living in an apartment with my husband and one year old daughter, waiting for our house to be built. I felt confined in such a small space during the day, being that it was a typical, HOT Arizona summer, and spent waaaay too much time perusing Ebay and the internet for something to spark my interest. I wanted to make and sell something. While seeking that pastime, I came across beautiful lampwork beads by some very talented artists. Goodness, they were quite pricey! I found myself looking specifically at these individual pieces of art, curious as to what was under the layers of glass…. More glass!! While I examined (and drooled over) them, I came across a couple websites and forums that had tutorials and illustrations as to the HOW of making these beads. I was completely intrigued and just had to learn how on my own.

I found a gal who lived quite close to me (serendipitous!) and she gave me a two hour demonstration, allowing me to create two little, very uneven beads. I came home and bought my first bead making torch and the glass to melt!

Museiddity: What do you most love about making beads?

Haley: Like lots of gals, I love sparkly things. And colorful things. And pretty things! Glass is all of the above…..and more! Just being able to mess around with colors and combinations helps with my creative urges, but watching that glass melt into shape has almost a therapeutic feel to it. Mesmerizing. Yet, frustrating at the same time. It’s not an easy task to make that glass go in the shape you want it. Not for me, anyway. But that tension between peace and agony is what makes it fun and challenging. I can easily get swept up trying to create the perfect bead, but when I just relax and enjoy the process is when I make, what I feel are, my best beads.

Museiddity: Ahh…, I call that “going into the zone.” You obviously found your niche! What did your family think about your new fascination with fire?

Haley: I thought my husband was gonna think I was crazy! But, honestly, he’s been nothing but supportive. I’m still more of a hobbyist than a business woman, so he, uh, has been monetarily supportive, as well. He has helped me create the perfect environment for this creative outlet and makes sure I have time to create, too, seeing we have two very busy kids. My daughter, who is now 10, can’t wait to learn how to lampwork, but is satisfied with making kid-friendly jewelry with my beads. She is a budding fashionista, so I do take her advice to heart when it comes to turning my beads into wearable items. My son grew up with me already creating and playing with fire, so he doesn’t really think much of it. I just make sure I preach fire safety–all the time–because, ironically, fire is my biggest fear!

Museiddity: But you took something that frightened you and turned it into art, what a way to slay your demons! Speaking of demons, what are some of the struggles you’ve faced pursuing your creative vision?

Haley: That could be a really long answer. But I will just say TIME is the biggest struggle. Finding time, mainly. As I said, I have two busy kids and a family that comes first. I don’t have an “out-of-the-home” job to occupy my days, so then time becomes a procrastination tactic, as well. I’m not necessarily self-motivated. I almost do better in a time-crunch. Does that make sense? When the pressure is on, I make better use of my time. And then I have the problem of not enough time again. It’s a vicious cycle, I tell ya. Maybe I need a little fire UNDER me instead of in front of me!!

Also, like most artists of all kinds, the muse disappears sometimes. Occasionally, it’s for long periods. Finding that creative energy and that spark is difficult. I used to have to pretty much stop making beads in the summer because I work out of my garage. It was way too hot out there without the added heat from the torch and kiln. When that physical block is put up for months at a time, the creativity gets stunted, too. Trying to pick up in October, or whenever it would start to cool down, would be extremely difficult.

Museiddity: At least you won’t have to worry about the heat anymore now that you have that new, air conditioned studio space.

I’ve watched you grow from hobby to successful small business. What tips do you have to share with other “creatives” embarking on similar journeys?

Haley: Stick with it. Stick with what you love. Stick with finding that creative spark. If you’re doing something you love, then it won’t truly matter if you’re monetarily successful or not. Your heart will be satisfied. I don’t ever want it to feel like a job. If it starts feeling like work, then I take a step back and figure out a way to bring the heart back into it.

Museiddity: Oh, staying true to your heart really is the most important lesson. I think I need to print that response and tape it above my desk!

I have fond memories of the day you graciously spent giving me my first lampworking lesson; I keep the beads we made that day hanging in my office as inspiration (smile). For those who are considering taking up the torch, what basic tools will they need to get started?

Haley: I have to caution anyone who wants to melt glass to first look up all safety measures. There really are a lot of measures that need to take place before you can just start making beads over an open flame. I won’t go into all the details of it right now (SO IMPORTANT), but those things need to be sorted out before you even think about melting a rod of glass. Of course the first safety measure is ensuring your torch isn’t going to catch something on fire! That should be obvious. But, there are other measures that are less obvious. Things like eye protection, proper ventilation and working near fire-retardant surfaces are just the start.

But, as for the materials, you will need glass rods, a small basic lampwork-specific torch, mandrels (which are the steel rods you wrap the melted glass around) and bead release, which is a cement-like substance that keeps your beads from sticking to the mandrels. You will also need an annealing blanket so your beads don’t all crack into bits before you can get them in a kiln. All these little gems need to be kiln annealed so that they don’t break easily. Basically, you can do the simplest set up for about $100.There is a little torch called a Hot Head that attaches to Mapp gas canisters. It’s what I started with and it’s only about $35. Almost all lampworking online stores have a great kit with all the basics to get you started. I definitely recommend just buying a small starter kit.

Lampworking, although I made it seem like I just dove in headfirst, isn’t something to pursue lightly. Even with the safety requirements you can still proceed fairly inexpensively, but my recommendation is to do plenty of research before you begin to purchase anything. And my biggest tip? Take a class or get a demonstration from an experienced bead maker before you begin.

Museiddity: Great advice!

In addition to making custom order beads you also have a beautiful line of jewelry; can we share some pics of your favorite pieces?

Haley: Sure!

Beads - 045 copy   Beads - 150  Ribbon Set Beads - 326


Museiddity: They’re all so beautiful! Thanks so much for sharing with us today, Haley.

Connect with Haley:
Store/Website: BuckleBottom Beads (www.bucklebottom.com)
Keep up with studio talk at BuckleBottom Blab (http://bucklebottom.blogspot.com)

Have you ever made glass beads? Do you have a story to share or a question for Haley? We’d love to hear from you!

I’ve Been Inked! My Portrait by Megan Eckman

HaMeowby Dick by Studio MMEve you met Megan at Studio MME? Meagan is an illustrator with a mission—to help people take back their imagination. With her mighty ink pen, Megan creates images of whimsy sure to touch your heart.

This year Megan is completing “a portrait a day” challenge by working from pictures received via email. I just had to share my portrait with you; I’m day 189! My Portrait by Megan at Studio MME

In addition to illustrating books, Megan applies her talents to embroidery patterns, jewelry, note cards, and prints for your home. She might even have a few spaces open in her “portrait a day” challenge! I highly recommend you take a moment to view her site; it’s guaranteed to bring a smile.

Hungry Purple Wallpaper by Studio MMEConnect with Megan Eckman:
Studio MME http://www.studiomme.com
Megan’s blog and shop are all in one place.

Creative Spotlight: Interview with Sarah Sequins, Designer of Wearable Art

Today we’re visiting with Sarah Sequins, “a jewelry designer and artist obsessed with all things sparkly.” Sarah hosts the popular blog Saturday Sequins, where she shares her works in progress, creative inspiration, laughs, and smiles. She is also writing an ebook, but we’ll get to that in a minute. First, let’s talk about bead weaving, bead embroidery, and working with sequins.

Museiddity: Hi Sarah! I’ve been happily following your blog for awhile now; eagerly awaiting each week’s inspiring post and pics of your latest masterpiece. How did you become interested in sequins and beading?

Sarah: Hi, Robyn! Thank you so much for featuring me! I’m excited that you’ve started this new blog.

When I look back, I can’t think of a time when I wasn’t interested in sparkly things. I started collecting them before I even knew what to do with them!

The first time I thought of sequins for jewelry making, I was eight or nine years old, and I wanted to reproduce a pair of sequin earrings I’d found at the mall. I taught myself how to work with sequins and chain without any special knowledge or tools – just my little fingers!

Around that time, my sister, who’s interested in Native American beading, taught me my very first, simple bead embroidery stitches. She helped me make my own leather moccasins one weekend and let me embellish them with beads. She was the one who introduced me to bead weaving, too – I owe her a lot!

Museiddity: I’ll bet they were beautiful!

You’ve often used the terms “bead and sequin embroidery” and “bead weaving,” what is the difference?

Sarah: Both types of bead work involve a needle and thread. The difference between bead embroidery and bead weaving is that embroidery involves passing the needle through a backing – usually some sort of fabric or felt. Bead weaving, on the other hand, doesn’t use a backing; jewelry and other items are made by passing the needle through the beads themselves, and sometimes the thread.

Both bead embroidery and bead weaving have different stitches and variations. They overlap in a few places, though, which makes it a lot of fun to experiment with combining them.

Museiddity: Many of your beading designs include sequins, what skills and materials do we need to work with them?

Sarah: For very basic sequin embroidery, you really don’t need much. Some sequins, a beading needle, some thread (I like Fireline, but mercerized cotton is fine, and so is nylon thread, or Nymo). Something to sew them to. If you can pass a needle through it, you can sew sequins and beads to it!

I suggest something stiff like craft felt, buckram, Lacy’s Stiff Stuff or Nicole’s BeadBacking when you start out, though, just because fabric can pucker if you pull your thread too tight. Stiff material prevents that.

As for skills, if you can sew a simple stitch with a needle and thread, you can sew a sequin! After that, the stitches tend to build on each other – if you can do one, you can figure the rest out.

Museiddity: Some sequins have no hole, how would we apply them?

Sarah: Most, if not all, of the sequins I buy have holes – I’d love to find some without holes and play around. But! There are plenty of times when I find shiny, sparkly bits of confetti in craft and hobby stores and want to turn them into sequins. To do this, I use a 1/16 inch circular hole punch, especially the Fiskars brand.

I’ve also drilled sequins with a hand-held drill before, with mixed success. It’s hard to drill more than one at a time because they tend to slide around, even when I used a vise or tape them together in a bundle. I’m still trying to figure things out – but that’s part of the fun.

Museiddity: I’ve seen the one without the holes labeled as sequin discs. I’m thinking of using them with a two-part epoxy jewelry clay…

It sounds like this has been quite a journey for you! What surprising things have you learned about yourself by beading?

Sarah: I’ve learned a lot about my own learning style. I used to call myself a verbal learner, but really, I’m a tactile learner. I learn by diving in with a basic, bare bones knowledge, making tons of mistakes, and then coming back to books, tutorials and classes when I need to refine my technique. When I let myself learn this way, I’m a fast learner, too – which is really exciting!

I’ve also learned that I’m surprisingly patient and detail-oriented while I bead. I would have never used those words to describe myself in other aspects of my life! Now that I know they exist, I’ve started to apply them to other areas, including non-creative ones.

Museiddity: That’s the beauty of art, it reflects back to us parts of ourselves we don’t normally see.

Sarah, if someone is interested in working with sequins, how would you suggest they begin?

Sarah: I have two answers to this question. This first is to dive in, play around, and see what happens. It’s a lot of fun, and it’s a great way to come up with your own innovative techniques – especially if you’re familiar with other types of arts/crafts. You can always bring your past experience to your work.

Not everyone learns the way I do, though. For people who need a little more direction, Stanley Levy’s book Bead and Sequin Embroidery Stitches is the best I’ve found. It’s very, very thorough, and the photos are absolutely gorgeous. His book is more for garment-makers, but most of his techniques translate to jewelry making.

Museiddity: Will you share a picture of one or two of your favorite pieces?

Sarah: Of course! Here are two photos of some of my favorite pieces. The one Floral Fiestawith the red flower is called Floral Fiesta, and it’s a mix of bead embroidery and bead weaving. The second one, the bracelet, is called Goth Birthday Goth Birthday CakeCake because when it’s fastened, it looks just like a birthday cake for Morticia Adams.

Museiddity: They’re both so beautiful…and the necklace is so intricate! You weren’t kidding when you said you were patient.

Thank you, Sarah, for visiting with us!

Connect with Sarah: You can keep up with Sarah Sequins at her blog, Saturday Sequins, or at her Etsy shop.

Sarah is writing an ebook!
Embracing your creative side can sometimes be a struggle, especially if you desire to support yourself with your gifts. To help, Sarah’s book addresses the emotional side of making a creative living. Modeling the book after some of her most popular posts like Don’t Give Up and Instead of Giving Up, Sarah offers much needed inspiration to keep on truckin’.

Sarah says, “It’s about some of the silly reasons people come up with for giving up on the things they love and the one and only reason to run away from your creative work like you’re being chased by raisins (which, if you remember, are evil). It features my oddball sense of humor, and tramples some popular ways of looking at things. And like all the things I write, it’s based on a problem I had and the way I solved it. Also, there’s going to be a fun workbook section.”

The book is scheduled to launch on July 6th; visit Sarah at Saturday Sequins for more information.

Do you love sparklies, beads, or raisins? If so let us know; we love comments and questions!

Join the Bead Hoarders Blog Hop

Bead_Hoarders_Blog_HopIt’s time to make use of your “special stash”–you know…all those beads you stash away and never use…

Pretty Things is hosting a Bead Hoarders Blog Hop on Saturday, July 20th. There’s still time to join in the fun! Just go to Pretty Things to sign up–hurry though, sign ups end June 28th.

Beading—A Beloved Hobby

african trading beads rlcOriginally a form of trade in primitive cultures, our fascination with beads has traveled through the ages. It would be difficult to find a culture that doesn’t have some history of bead making. Perhaps it is because of this long term history that people gravitate to beaded items; it’s in our subconscious mind, an inborn fascination. Take a trip to any museum and watch how people flock to the beaded exhibits. Personally, I would list beading as a universal language, right up there with music and painting.

This natural attraction combined with simplicity makes beading a beloved hobby—anyone who can push a string through a hole can create something beautiful! What’s even better…you don’t need to buy beads; you can make them or use unusual objects. Any object you can string is a potential bead—and when you think of it that way the possibilities are mind boggling!

One of the easiest ways to make beads at home is with paper. Simply wrap a strip of colorful paper around a skewer or toothpick. Dab a bit of glue at the end of the wrapping, let dry, and apply a coat of acrylic sealer. Judi Kins Diamond Glaze will seal your beads without any tackiness. Once dry, it feels like a hard plastic coating. paper beads by rlc

Here are a few of my paper beads; I applied the same technique to craft ribbon which resulted in some very pretty lavender beads. This is child-friendly craft. There are plenty of instructional tutorials on YouTube, or you can download a free .pdf, with patterns for making different shaped beads, over at Big Bead Little Bead.

beading 001 rlcWith a bit more skill, and access to an oven, you can delve into the world of polymer clay. Or, with a pair of flush cutters and a bit of wire you can go on a wrapping spree. Wire wrapping opens the door to viewing ordinary objects in a whole new light. That shell, coin, or stone on your dresser can be a pendant in just a matter of minutes! My current project includes puzzle pieces which don’t require any wire, just a small punch with a nail.

So go ahead—stroll through your home and see what you can find to create your next masterpiece. And remember, beading isn’t limited to jewelry!chained vase rlc

Why do you love to bead? What is the strangest object you’ve ever used in a project? Ever had a beading catastrophe? Please share!

Guest Post: When You Can’t Wait for Inspiration by Michelle Mach

Today I welcome Michelle Mach to Museiddity. Michelle is one of my favorite craft artists. I first met her while scheduling stops for a book tour; it was her work that inspired me to combine my writing and crafting. Please enjoy this guest post by Michelle Mach.

Beads & BooksWhen You Can’t Wait for Inspiration
by Michelle Mach

I get irritated when artists and writers talk about drifting dreamily around the house waiting for the magical burst of inspiration that will send them to the studio. I’ll admit I’m jealous. As someone who creates for a living, I don’t have that luxury. This weekend, for example, I need to come up with three original project designs–one home decor item and two pieces of jewelry–for a client. I have a deadline less than two weeks away, not to mention a host of other activities, including fulfilling a large wholesale order for a home decor store and editing three forthcoming jewelry books. I won’t be employed for long if I come up empty-handed and blame my uncooperative Muse.

You may not design craft projects for a living, but I bet there are times when you want to create something without a specific idea in mind. Here are three tricks I employ to jump start inspiration:

Examine Your Materials
I get many ideas from new materials such as an unusually shaped bead or a color I haven’t seen in awhile. The materials don’t even have to be new. Sometimes I’ll go “shopping” in my own stash of craft supplies, finding materials that I haven’t used for awhile. If I’m writing, my “material” might be notes in my journal or maybe books that I’m reading. If your own materials have you stumped, ask a friend for help. I’ve written stories prompted by one-word suggestions from friends and designed jewelry with beads that I did not choose.

Keep a Sketchbook or Journal
I keep a couple of different notebooks for drawings of project ideas or jotted notes for stories. Some of these sketches do turn into finished projects, but most don’t. Instead, my journal serves as my security blanket. I know that if I’m absolutely stuck for an idea, I can flip through my notebook and find one. (Whatever you do, make sure your notes are complete. I have a mysterious note about “chicken coffee bark” in an old notebook that I don’t think I’ll ever decode.)

Try Something New
It doesn’t have to be anything related to your craft. A new dessert recipe, a walk through a new-to-you park, or a book in an unfamiliar genre can wake up your imagination. The experiences don’t even have to be positive ones. I once sold a humorous essay about my new, hideously bad haircut.

Treasure those bursts of inspiration where ideas collide in your head and produce spectacular fireworks. But remember you don’t need to wait for those times. You can create any day, every day.

Michelle MachBio
Michelle Mach is a writer, editor, and jewelry designer in Colorado. Her jewelry designs have appeared in numerous magazines, including Stringing, Bead Trends, Easy Wire, and many others. Her essays and creative nonfiction have appeared in nearly a dozen anthologies, including The Ultimate Teacher and Classic Christmas. Visit her blog at http://www.michellemach.com/blog and her Etsy shop at http://www.etsy.com/shop/michellemach

Do You Enjoy Halloween?

I’m so excited I could burst!

I love the fall season…and Halloween/Samhain. For those of you unfamiliar with “Samhain” it is pronounced “sow’ en” and is the Wiccan New Year. I won’t go into a lot of explanation right now but suffice to say that October is one month where just about everyone is into crafting whether it be costumes, home decor or party planning. Which brings me back to my announcement…

Museiddity has been accepted into this year’s Samhain Sirens October Extravaganza! Throughout October the website, Samhain’s Sirens, will feature blog posts and giveaways in celebration of the season. I’ll be posting some craft “how tos” and also offering items for giveaways. We are going to have a lot of fun! It’s a long time ’til October though…

In the meantime… June will be beading month here at Museiddity! We’ll be talking with a jewelry artist, a “sequinista”, and a lamp worker (maker of glass beads)…and I might offer some sneak peaks of my October Extravaganza giveaways. If you love jewelry you’ll want to join us!

Creative Spotlight: Destiny Allison, Artist and Author–Guest Post and Book Launch Announcement

Destinyl__3964Today I welcome metal sculpture artist and author Destiny Allison. I first “met” Destiny while managing a WOW Blog Tour for her memoir, Shaping Destiny. Her book, and her sculptures, connected with me in a deep way. Destiny has recently finished her first novel, Pipe Dreams. I’ll share more about that in a minute.

Destiny possesses a compelling “voice”; I find it strong, intelligent and poetic. To give you a taste of her writing I’ve invited her to share an essay about her own creative “awakening”.

Destiny Allison on embracing her creative spirit…

After I discovered my voice, I was quiet. No shout of joy or cartwheel whoop issued from my pressed lips. Hands on hips, eyes narrowed, I contemplated the tiny, regal figure who had freed me. Her brown skin, slick with my sweat, glistened in the morning light. She did not meet my eyes, care for my interest, or notice me at all. Instead, her gaze was to the horizon, focused on something I couldn’t see.

I hungered after her, oblivious to the demands of happy children sticky with juice. Ignoring dishes, spilled cheerios on the breakfast table, and the guttural snores of a sleeping husband, I stroked her hair with a fingertip, pushed my nail deep into the line between her lips, and cemented her expression. She did not mind the pain I inflicted or acknowledge the ache she had kindled in me. I added a bit of clay to her arm, defining and strengthening. Then she looked wrong, unbalanced, and artificial. I tweaked, smoothed, and adored until I destroyed her, my image of who I wanted to be.

I pushed her away, furious with myself, and turned my attention to my youngest. Runny nosed and crying, he had tripped chasing his brothers. I pulled him into my arms, rocking, and as I did my eyes drifted toward the horizon. It shimmered, taunting me with hope, possibility, and dreams.

When my child’s sobs ceased, I set him down and picked up my ruined sculpture. Somewhere in that soft, awkward form was my future. A tiny hand grabbed my leg, but I was intent. He tugged again, asking for a drink. I sighed, stepped into the kitchen, and handed him his cup. Then, for the first time and without regret, I said, “Go play, sweetheart. Mommy’s working.”

Coming June 3rd–Pipe Dreams, A novel by Destiny Allison Pipe_Dreams_preview.1

Destiny’s first novel is a fast-paced dystopian sci-fi made all the more horrifying by the feeling that this scenario could very well happen at any given time. If you like The Handmaid’s Tale you’ll love Pipe Dreams. Here is the author’s description:

Beneath the park bench, a young girl cries for help, her voice a cold hand on Vanessa’s throat. Bruised and ravaged, the naked girl is Vanessa’s mirror twin, but compassion for the Fallen won’t be forgiven. “Please,” the girl whispers. In the empty square, a piece of trash tumbles. A bird settles in a tree. Then there is silence. No voice, no wind, no movement. It’s as if the world is waiting.

Vanessa’s hesitation is her undoing. Unbeknownst to her, Lewis seeks his revenge. The virus, originally developed to save mankind from itself, will be his tool. Once airborne, it will create a slave race and retribution will be his. Vanessa is the symbol of everything he hates. She will be his unwitting pawn. Haunted by her thick, auburn hair, serious eyes, and mocking laughter, Lewis is determined to quiet her once and for all.

As his plan unfolds, Vanessa is forced to flee. Escaping through the sewer, she finds love, heartbreak, and the red beam of a gun sight dancing on the slick, black wall. In the deep dark of the foul pipe, Vanessa also discovers she has been betrayed. That’s when she learns Texas is real.

One reviewer stated, “Pipe Dreams is a dystopian novel set in the near future. If gene splicing could merge Margaret Atwood and Suzanne Collins, the resulting author might write this book.”

To download the first two parts FREE, and get updates on the full release, sign up for the mailing list.

TO PREORDER THE PAPERBACK VERSION OF PIPE DREAMS, CLICK HERE.

Destiny is “paying it forward” by donating 25% of her first month’s sales towards another artist’s goals. Visit her blog for more details.

Sunflower Kooky Clock: Make a Clock with Clay and a Tiny Tin.

Wacky Time by rlcHung up on time? Set this funky clock on your desk as a reminder to lighten up!

I originally created this clock as part of the Tiny Tin Challenge and have been using it as my desk clock ever since! Materials are readily available at your local craft store. You can complete this project in an afternoon (depending on the drying time for your paint). To read the original post and access the other Tiny Tin participants visit A Ponderance of Things.

Materials List:

1 Tiny Tin

1 plastic, battery operated clock. Disassembled and reassembled using the tin as the clock face.

Sculpy Ultra Light oven bake clay

Acrylic paints and sealant

Paint pens for face of clock (optional)

Directions:

Disassemble clock to insure backing will fit inside your tiny tin. Mark the spot for the pin that hold the clock hands. Drill the whole. File any sharp edges.

Create your Sculpy form directly on the tin cover. Be sure to check that Sculpy form does not interfere with replacement of the tin bottom. Bake cover for the required time to harden clay.

Once cover has cooled, paint your sculpture and clock face. Allow to dry completely before applying sealant.

Apply sealant. Allow to dry completely.

Reassemble clock onto the tin cover. Depending on your sculpture you may need to trim the clock hands. (Note: reassembling the clock may require realigning the clock wheel mechanisms).

Insert battery into clock and snap the cover back onto the tin bottom.