Creative Spotlight: Interview with Sarah Sequins, Designer of Wearable Art

Today we’re visiting with Sarah Sequins, “a jewelry designer and artist obsessed with all things sparkly.” Sarah hosts the popular blog Saturday Sequins, where she shares her works in progress, creative inspiration, laughs, and smiles. She is also writing an ebook, but we’ll get to that in a minute. First, let’s talk about bead weaving, bead embroidery, and working with sequins.

Museiddity: Hi Sarah! I’ve been happily following your blog for awhile now; eagerly awaiting each week’s inspiring post and pics of your latest masterpiece. How did you become interested in sequins and beading?

Sarah: Hi, Robyn! Thank you so much for featuring me! I’m excited that you’ve started this new blog.

When I look back, I can’t think of a time when I wasn’t interested in sparkly things. I started collecting them before I even knew what to do with them!

The first time I thought of sequins for jewelry making, I was eight or nine years old, and I wanted to reproduce a pair of sequin earrings I’d found at the mall. I taught myself how to work with sequins and chain without any special knowledge or tools – just my little fingers!

Around that time, my sister, who’s interested in Native American beading, taught me my very first, simple bead embroidery stitches. She helped me make my own leather moccasins one weekend and let me embellish them with beads. She was the one who introduced me to bead weaving, too – I owe her a lot!

Museiddity: I’ll bet they were beautiful!

You’ve often used the terms “bead and sequin embroidery” and “bead weaving,” what is the difference?

Sarah: Both types of bead work involve a needle and thread. The difference between bead embroidery and bead weaving is that embroidery involves passing the needle through a backing – usually some sort of fabric or felt. Bead weaving, on the other hand, doesn’t use a backing; jewelry and other items are made by passing the needle through the beads themselves, and sometimes the thread.

Both bead embroidery and bead weaving have different stitches and variations. They overlap in a few places, though, which makes it a lot of fun to experiment with combining them.

Museiddity: Many of your beading designs include sequins, what skills and materials do we need to work with them?

Sarah: For very basic sequin embroidery, you really don’t need much. Some sequins, a beading needle, some thread (I like Fireline, but mercerized cotton is fine, and so is nylon thread, or Nymo). Something to sew them to. If you can pass a needle through it, you can sew sequins and beads to it!

I suggest something stiff like craft felt, buckram, Lacy’s Stiff Stuff or Nicole’s BeadBacking when you start out, though, just because fabric can pucker if you pull your thread too tight. Stiff material prevents that.

As for skills, if you can sew a simple stitch with a needle and thread, you can sew a sequin! After that, the stitches tend to build on each other – if you can do one, you can figure the rest out.

Museiddity: Some sequins have no hole, how would we apply them?

Sarah: Most, if not all, of the sequins I buy have holes – I’d love to find some without holes and play around. But! There are plenty of times when I find shiny, sparkly bits of confetti in craft and hobby stores and want to turn them into sequins. To do this, I use a 1/16 inch circular hole punch, especially the Fiskars brand.

I’ve also drilled sequins with a hand-held drill before, with mixed success. It’s hard to drill more than one at a time because they tend to slide around, even when I used a vise or tape them together in a bundle. I’m still trying to figure things out – but that’s part of the fun.

Museiddity: I’ve seen the one without the holes labeled as sequin discs. I’m thinking of using them with a two-part epoxy jewelry clay…

It sounds like this has been quite a journey for you! What surprising things have you learned about yourself by beading?

Sarah: I’ve learned a lot about my own learning style. I used to call myself a verbal learner, but really, I’m a tactile learner. I learn by diving in with a basic, bare bones knowledge, making tons of mistakes, and then coming back to books, tutorials and classes when I need to refine my technique. When I let myself learn this way, I’m a fast learner, too – which is really exciting!

I’ve also learned that I’m surprisingly patient and detail-oriented while I bead. I would have never used those words to describe myself in other aspects of my life! Now that I know they exist, I’ve started to apply them to other areas, including non-creative ones.

Museiddity: That’s the beauty of art, it reflects back to us parts of ourselves we don’t normally see.

Sarah, if someone is interested in working with sequins, how would you suggest they begin?

Sarah: I have two answers to this question. This first is to dive in, play around, and see what happens. It’s a lot of fun, and it’s a great way to come up with your own innovative techniques – especially if you’re familiar with other types of arts/crafts. You can always bring your past experience to your work.

Not everyone learns the way I do, though. For people who need a little more direction, Stanley Levy’s book Bead and Sequin Embroidery Stitches is the best I’ve found. It’s very, very thorough, and the photos are absolutely gorgeous. His book is more for garment-makers, but most of his techniques translate to jewelry making.

Museiddity: Will you share a picture of one or two of your favorite pieces?

Sarah: Of course! Here are two photos of some of my favorite pieces. The one Floral Fiestawith the red flower is called Floral Fiesta, and it’s a mix of bead embroidery and bead weaving. The second one, the bracelet, is called Goth Birthday Goth Birthday Cake
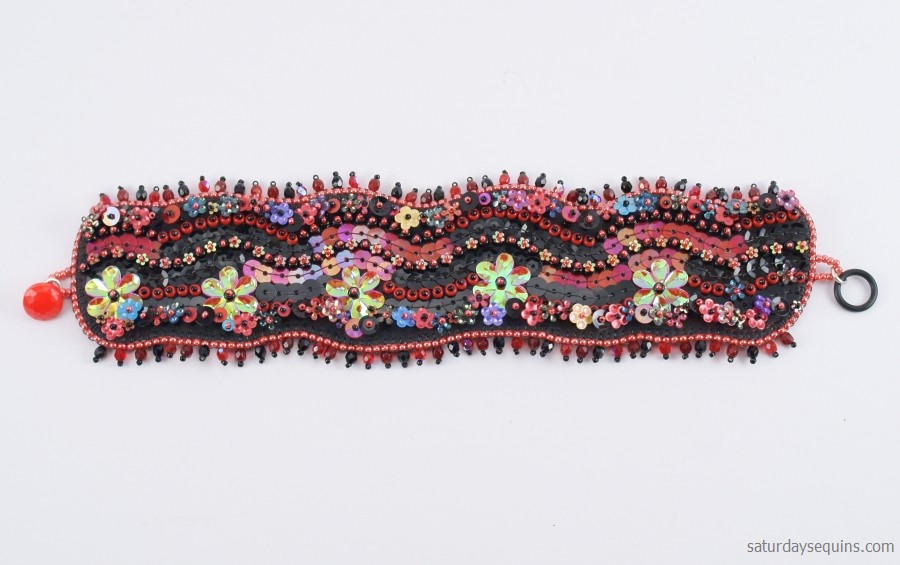
Cake because when it’s fastened, it looks just like a birthday cake for Morticia Adams.

Museiddity: They’re both so beautiful…and the necklace is so intricate! You weren’t kidding when you said you were patient.

Thank you, Sarah, for visiting with us!

Connect with Sarah: You can keep up with Sarah Sequins at her blog, Saturday Sequins, or at her Etsy shop.

Sarah is writing an ebook!
Embracing your creative side can sometimes be a struggle, especially if you desire to support yourself with your gifts. To help, Sarah’s book addresses the emotional side of making a creative living. Modeling the book after some of her most popular posts like Don’t Give Up and Instead of Giving Up, Sarah offers much needed inspiration to keep on truckin’.

Sarah says, “It’s about some of the silly reasons people come up with for giving up on the things they love and the one and only reason to run away from your creative work like you’re being chased by raisins (which, if you remember, are evil). It features my oddball sense of humor, and tramples some popular ways of looking at things. And like all the things I write, it’s based on a problem I had and the way I solved it. Also, there’s going to be a fun workbook section.”

The book is scheduled to launch on July 6th; visit Sarah at Saturday Sequins for more information.

Do you love sparklies, beads, or raisins? If so let us know; we love comments and questions!

Advertisement

Join the Bead Hoarders Blog Hop

Bead_Hoarders_Blog_HopIt’s time to make use of your “special stash”–you know…all those beads you stash away and never use…

Pretty Things is hosting a Bead Hoarders Blog Hop on Saturday, July 20th. There’s still time to join in the fun! Just go to Pretty Things to sign up–hurry though, sign ups end June 28th.

Beading—A Beloved Hobby

african trading beads rlcOriginally a form of trade in primitive cultures, our fascination with beads has traveled through the ages. It would be difficult to find a culture that doesn’t have some history of bead making. Perhaps it is because of this long term history that people gravitate to beaded items; it’s in our subconscious mind, an inborn fascination. Take a trip to any museum and watch how people flock to the beaded exhibits. Personally, I would list beading as a universal language, right up there with music and painting.

This natural attraction combined with simplicity makes beading a beloved hobby—anyone who can push a string through a hole can create something beautiful! What’s even better…you don’t need to buy beads; you can make them or use unusual objects. Any object you can string is a potential bead—and when you think of it that way the possibilities are mind boggling!

One of the easiest ways to make beads at home is with paper. Simply wrap a strip of colorful paper around a skewer or toothpick. Dab a bit of glue at the end of the wrapping, let dry, and apply a coat of acrylic sealer. Judi Kins Diamond Glaze will seal your beads without any tackiness. Once dry, it feels like a hard plastic coating. paper beads by rlc

Here are a few of my paper beads; I applied the same technique to craft ribbon which resulted in some very pretty lavender beads. This is child-friendly craft. There are plenty of instructional tutorials on YouTube, or you can download a free .pdf, with patterns for making different shaped beads, over at Big Bead Little Bead.

beading 001 rlcWith a bit more skill, and access to an oven, you can delve into the world of polymer clay. Or, with a pair of flush cutters and a bit of wire you can go on a wrapping spree. Wire wrapping opens the door to viewing ordinary objects in a whole new light. That shell, coin, or stone on your dresser can be a pendant in just a matter of minutes! My current project includes puzzle pieces which don’t require any wire, just a small punch with a nail.

So go ahead—stroll through your home and see what you can find to create your next masterpiece. And remember, beading isn’t limited to jewelry!chained vase rlc

Why do you love to bead? What is the strangest object you’ve ever used in a project? Ever had a beading catastrophe? Please share!

Guest Post: When You Can’t Wait for Inspiration by Michelle Mach

Today I welcome Michelle Mach to Museiddity. Michelle is one of my favorite craft artists. I first met her while scheduling stops for a book tour; it was her work that inspired me to combine my writing and crafting. Please enjoy this guest post by Michelle Mach.

Beads & BooksWhen You Can’t Wait for Inspiration
by Michelle Mach

I get irritated when artists and writers talk about drifting dreamily around the house waiting for the magical burst of inspiration that will send them to the studio. I’ll admit I’m jealous. As someone who creates for a living, I don’t have that luxury. This weekend, for example, I need to come up with three original project designs–one home decor item and two pieces of jewelry–for a client. I have a deadline less than two weeks away, not to mention a host of other activities, including fulfilling a large wholesale order for a home decor store and editing three forthcoming jewelry books. I won’t be employed for long if I come up empty-handed and blame my uncooperative Muse.

You may not design craft projects for a living, but I bet there are times when you want to create something without a specific idea in mind. Here are three tricks I employ to jump start inspiration:

Examine Your Materials
I get many ideas from new materials such as an unusually shaped bead or a color I haven’t seen in awhile. The materials don’t even have to be new. Sometimes I’ll go “shopping” in my own stash of craft supplies, finding materials that I haven’t used for awhile. If I’m writing, my “material” might be notes in my journal or maybe books that I’m reading. If your own materials have you stumped, ask a friend for help. I’ve written stories prompted by one-word suggestions from friends and designed jewelry with beads that I did not choose.

Keep a Sketchbook or Journal
I keep a couple of different notebooks for drawings of project ideas or jotted notes for stories. Some of these sketches do turn into finished projects, but most don’t. Instead, my journal serves as my security blanket. I know that if I’m absolutely stuck for an idea, I can flip through my notebook and find one. (Whatever you do, make sure your notes are complete. I have a mysterious note about “chicken coffee bark” in an old notebook that I don’t think I’ll ever decode.)

Try Something New
It doesn’t have to be anything related to your craft. A new dessert recipe, a walk through a new-to-you park, or a book in an unfamiliar genre can wake up your imagination. The experiences don’t even have to be positive ones. I once sold a humorous essay about my new, hideously bad haircut.

Treasure those bursts of inspiration where ideas collide in your head and produce spectacular fireworks. But remember you don’t need to wait for those times. You can create any day, every day.

Michelle MachBio
Michelle Mach is a writer, editor, and jewelry designer in Colorado. Her jewelry designs have appeared in numerous magazines, including Stringing, Bead Trends, Easy Wire, and many others. Her essays and creative nonfiction have appeared in nearly a dozen anthologies, including The Ultimate Teacher and Classic Christmas. Visit her blog at http://www.michellemach.com/blog and her Etsy shop at http://www.etsy.com/shop/michellemach

No-Sew-No-Glue Burlap and Bead Wreath

This wreath is so simple to make. No sewing, no glue—just the wreath form, some No Sew No Glue Burlap Wreath by rlcwire, and some beads.

While traipsing through the aisles at Michaels craft store, I spied two adorably sweet burlap wreaths decorated with ribbons and silk flowers. This looked like a fun and simple craft to share! Of course, I had to change it up a bit…

Tools:

Burlap or Jute:Burlap Wreath Tools
Burlap garland should be available by the roll at the local craft store. The strip is 10 yards long by 5/12 inches wide and it cost about seven dollars. In a pinch you could use strips of any stiff fabric.

Wreath Form:
There are several different types of wreath forms available at the local craft store. I used a metal form, but you might also try one of the flat wood forms. You can also craft your own by cutting a large circle from a piece of heavy cardboard.

Twist Ties/Wire:
You will need something to secure each section of fabric, I used floral wire but you could also use twist ties or pipe cleaners.

You will also need wire to go through your beads and buttons. You could use floral wire here also provided the wire fits through your bead. I used soft, copper jewelry wire.

Wire cutters

Ribbon, beads, and other embellishments.

Directions:

Measure out three strips of burlap. Each strip should be equivalent to 1 ½ time around your wreath to allow extra material for “poofing.”

Secure all three strips to your wreath with a twist tie. Burlap Wreath Directions 1

Now you can begin making your sections. This is basically fiddling with the three strips to make “poofs” around your wreath. Play with how the strips lay against each other. Try folding one strip a bit to add additional interest. Apply a twist tie at the end of each section.Burlap Wreath Directions 2

When you’ve worked you way around the wreath turn it over and trim your twist ties.

Now comes the fun part! It’s time to embellish your creation. If you will be tying ribbons around your gathered sections do so now.

Cut a length of wire for each bead or button. The length depends on how thick your bead is but two or three inches should do the trick.Burlap Wreath Directions 3

Thread your bead or button onto the wire. Pinch the wires together at the back and twist the two ends together to form a pick.

Insert your picks into the burlap. They only need to go through one strip of fabric. Pinch the fabric between the bead and your wire pick to secure.

This is a very simple version that Burlap Wreath Directions 4can be made even more decorative by applying some basic jewelry making techniques; since there is no glue or sewing to worry about, you can change the embellishments anytime!

Burlap Wreath FinalShow us your wreath! If you make a No-Sew-No-Glue Burlap Wreath we’d love to see it! Send me a note via the comment section if you’d like to post a picture of your wreath here at Museiddity.

It’s Bead Month at Museiddity! We’ll be exploring different ways you make beads at home plus we have a few guests coming to visit. Sign up to follow so you don’t miss the fun!

Update: See this wreath dressed up for Fall!

Fall Burlap Wreath by RLC

Check Out Another Easy Wreath! This Burlap Wreath with Corsage Style Ornaments only requires florist wire and a bit of florist tape.

Autumn Burlap Wreath by RLC