Re-Booting my Creative Life with a Creative Gift

There’s nothing like creating for others to re-boot your own creative spark.

We’ve all experienced times when life’s challenges seem to rob our energy, vision, and enthusiasm. Instinctively we know that to thrive we need to get back into our creative world, but the muse seems silent. I’ve found that when faced with these times creating a gift for a loved one or for charity raises my enthusiasm enough to follow through with the project.

I’m just now emerging from what has been a very difficult time. I knew I needed to complete a project, and that a deadline would help me follow through. Then I realized I still had time to send in an entry for this year’s Twitter Art Exhibit (TAE); that was just what I needed to get me rolling again.

Each year TAE hosts an art exhibit to benefit charity. Open to artists of all skill levels, the proceeds from sales of postcard size original artwork go directly to the charity. This year’s recipient is Pegasus, an Australian-based charity that provides horse-facilitated therapy programs for people with disabilities.

OLYMPUS DIGITAL CAMERAMy entry is entitled “I’m Pretty Too!” A common moth, noticing human pre-occupation with butterflies, wants us to remember that every creature holds its own unique beauty. When we judge ourselves according to other people’s abilities or accomplishments, we become blind to what we ourselves have to offer.

Time is growing short, but there may still be time to send in your entry. For more information, visit Twitter Art Exhibit.

Advertisement

Creative Spotlight: Tori O’Shea, Photographer of Storms, Nature, and the Macabre

What is your vision of the perfect life? Would you like to blend all of your favorite interests, pastimes, and talents into a profession you love waking up to? That is exactly what today’s guest is doing!

Please meet artist, photographer, and meteorologist Tori O’Shea: a fun-loving twenty-something who is combining all her favorite things into one amazing, creative life. She’ll be sharing five tips for taking up photography as a hobby, and we’ll tell you how to purchase her prints!

roofchase2WMDAbout Tori:

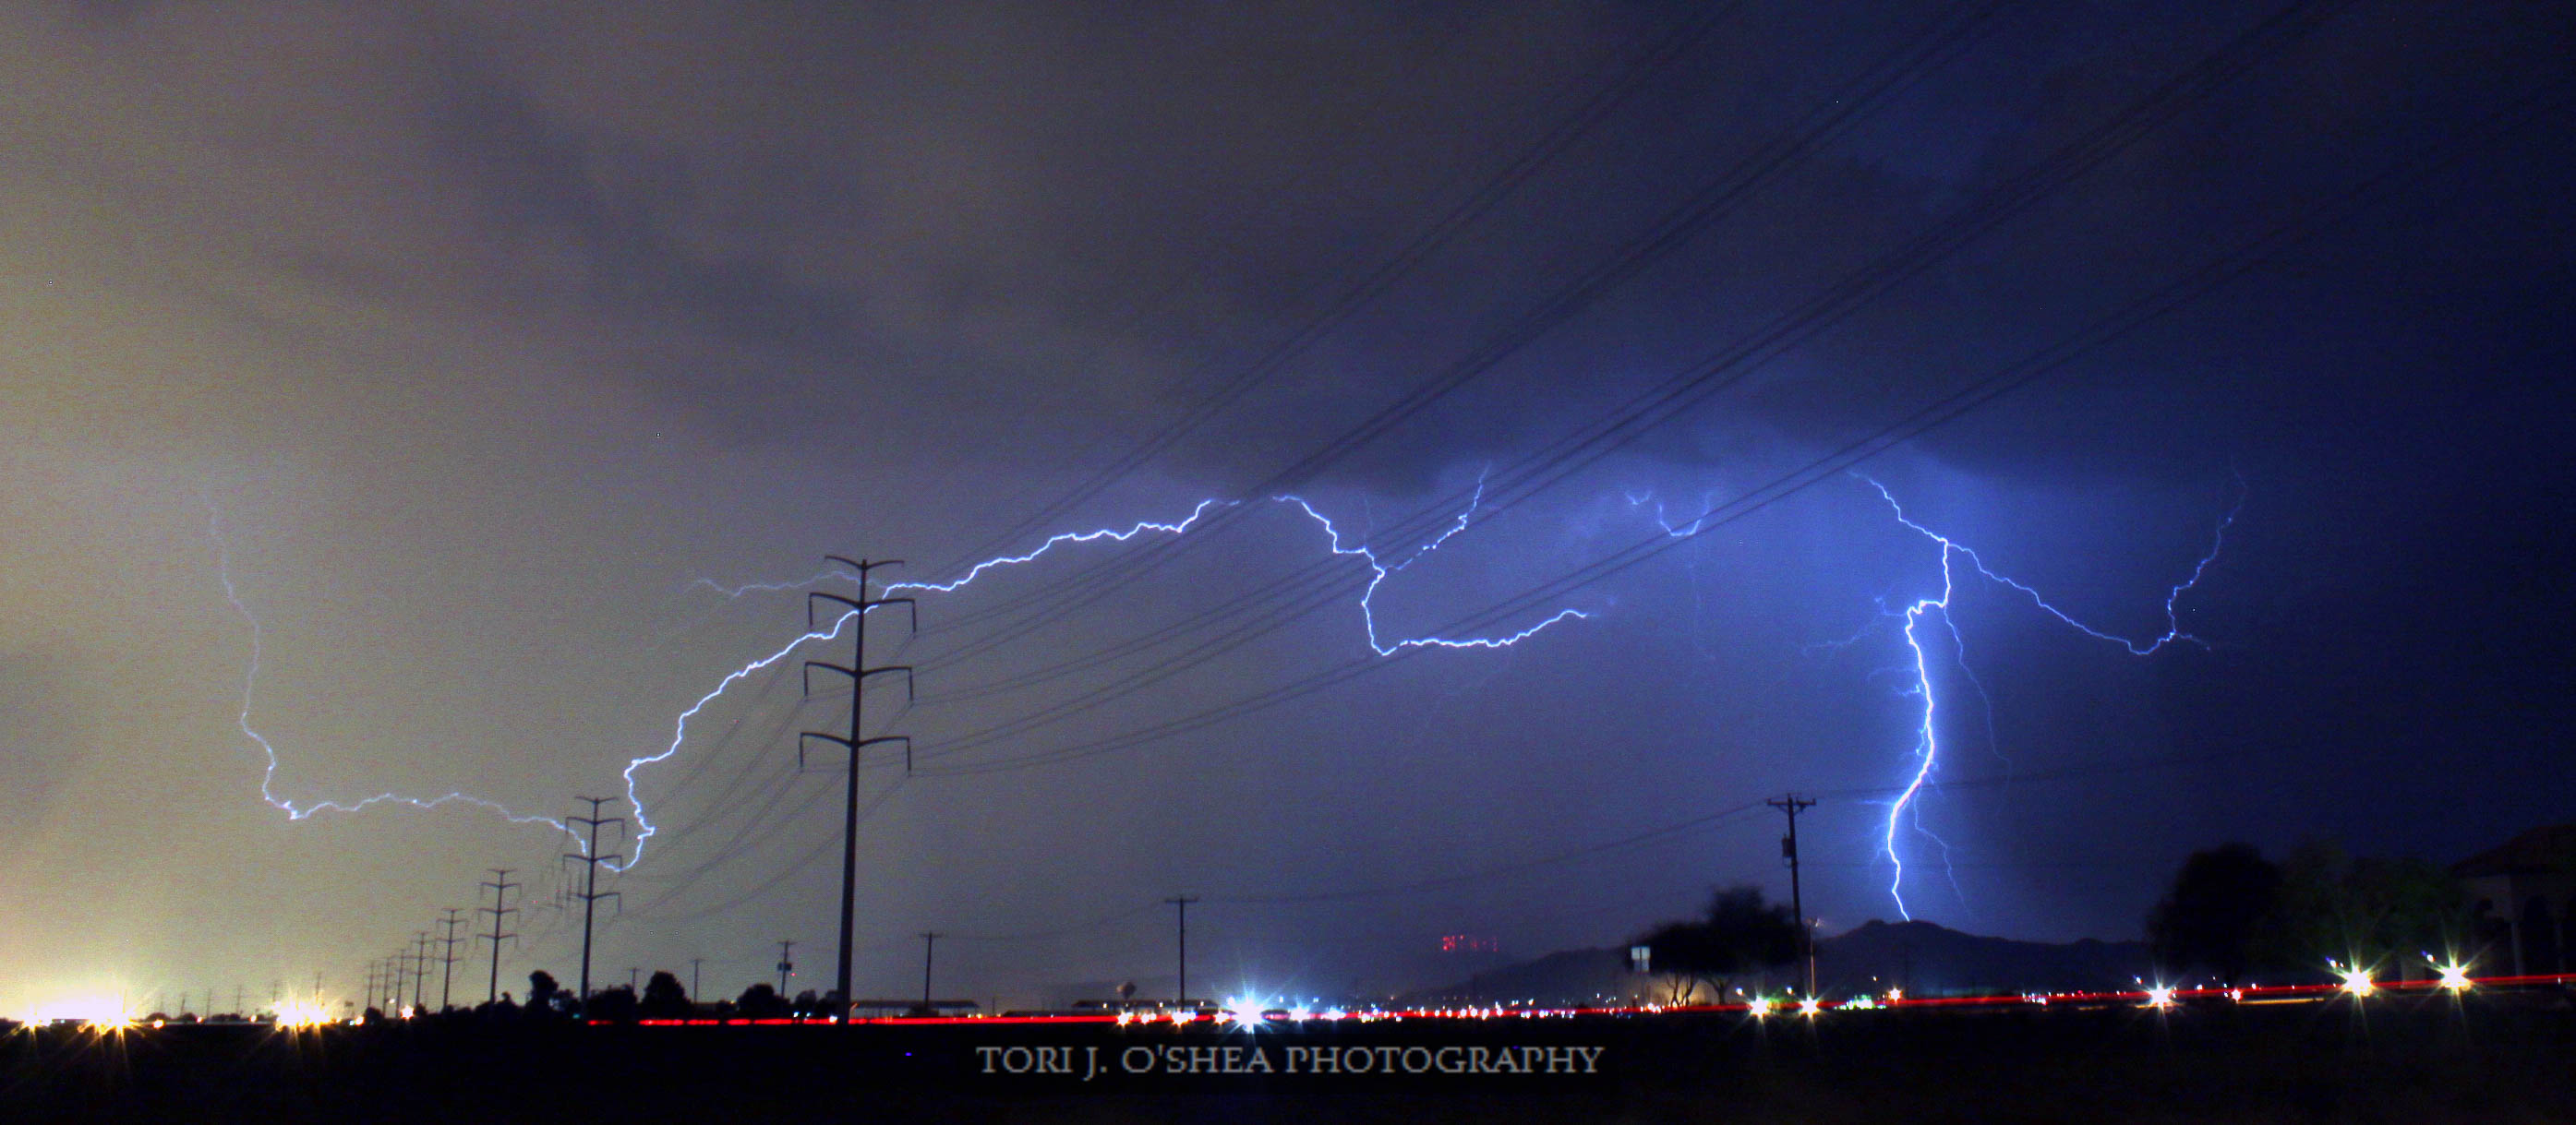
I am a 25 year old meteorology student. Severe weather and art have both been my passions since I was a very small child; so small, in fact, that I don’t even remember when I decided that I wanted to chase storms. It’s been ingrained in my blood since before I formed memories. At two years old, I began drawing. I was always drawing; in fifth grade I got a detention for drawing in class. At twelve, my interest in photography came about. Throughout high school I took photo classes and my passion for it was set in stone. I realized that, of course, I could fuse my love of the lens in with my love of severe weather, and I’ve been chasing storms casually for photography purposes (and for my own love of simply watching them, of course) for almost eight years; however, I’ve been chasing seriously (with the intent of paving a road to a real career) for a little under a year now. I went full-on into it last year after I met a group of local storm chasers- new friends with the same passion as mine (this was amazing, as I have been so accustomed to being the only person I’ve ever met who’s wanted to do this with love for it since early childhood- and now I have a group of amazing, talented friends with the same love- a big shout out to Bryan, Mike, Christian, Andy, Corbin, Trey, and everyone else! The list is a tad too long to include in full here, but these people really lit a fire within me and inspired me to take myself to the next level) and I haven’t looked back since. In the future, I hope to be published in Arizona Highways and National Geographic, and I hope to work for a storm tour company or, at the very least, be able to work storm chasing into how I make a living in some way. To live entirely off of my passion is my aim and major focus right now for sure.

Museiddity: Hi Tori. In your opinion, how important is creativity in regards to daily life?

Tori: It is crucial. Sure, there’s a lot of times where all it takes to get a good shot is to set your camera up, make sure the settings are all correct and get to shooting- but this won’t help you make your “good shots” interesting. Creativity is where the human element meets the technicals; how does one go about combining their technical knowledge with their desire to make a beautiful piece of work? This is where the creativity comes in; without it, everyone’s work would be similar and in no way truly their own. It is our creativity that makes us individuals, from the way we dress to the way we choose to express ourselves. Without it, we’d all simply be cogs in a machine. A boring, boring machine.

Museiddity: How has the camera lens changed your view of the world?

Tori: I’d have to say that it has made it more beautiful. I can see art and beauty in things that many people see only decay or danger in. I have a love for things like abandoned buildings and weather that can kill, a love for the darker side of human expression (like an image I 216710_10151613267710087_1534070582_nshot in an abandoned jail cell in Jerome, Arizona in which someone had spray-painted “IT WAS MORE FUN IN HELL” on the wall, or an image I shot that people continually tell me is “unsettling” of a brilliant piece of graffiti in Flagstaff of a small child staring upward at a large boulder hovering above their head), and I love it. Without the eye of an artist, I’d still appreciate beauty like any human being, of course- but I do feel that art and photography has turned an appreciation of beauty into a untitled (1 of 6)deeper understanding of why something is beautiful, even if it’s morbid or revolting. To someone else, it might be creepy, or weird, or even totally crazy, but as said by Hunter S. Thompson, “‘Crazy’ is a term of art; ‘Insane’ is a term of law. Remember that and you’ll save yourself a lot of trouble.”

Museiddity: Many of the “masters” walked that gray line! It takes courage to share uncommon visions. What message, if any, are you trying to convey through your art?

Tori: I seldom try to convey any singular messages in particular, honestly- what I try to achieve is to tell a story that begins and ends in the same image. I want it to suck you in, draw you through, and safely drop you off at the end after ruffling your hair a bit.

Museiddity: I love that last line! You stated your work has been featured in a tattoo? There must be a story behind that!

Tori: Oh man! That IS a funny story in the sense that it was so unexpected; my senior year of high school, I was at Denny’s with a group of friends and I was drawing (as usual) on a napkin. It was the only thing available. Well, when I was younger (and admittedly, still now) I was a fan of a morbid cult comic book series called Johnny the Homicidal Maniac; in one particular issue, the main character says the phrase “Immortalize the moment!” while brandishing a pair of large knives at his date (I know, I know, don’t judge). I drew a machete-style knife with that phrase embedded in it, and set the napkin aside to draw on another one. I didn’t think much of it at all until my friend Matt showed me that he’d gotten that napkin drawing tattooed! He liked it so much that he put it on his body permanently- how cool is that?

Museiddity: Wow, I can’t even imagine how you felt when you saw that! Thank you for sharing your thoughts with us today. IMG_0251WMD

Tori’s Five Tips for Taking Up Hobby Photography:

1. Learn, learn and learn some more. I can’t state this enough. If you know the ins and outs of how your camera works, what each setting is and how it relates to each other setting, it will absolutely make all of the difference in your final work.

2. Once you’ve learned about the technical aspects- practice them! You can ace every test in your photography class, but without actually going out and working through real-life scenarios in studio and on site, you’ll never really know anything despite having learned it.

3. Watch your ISO. This is your film speed (in both digital and film photography), and it is one of the factors that determines how sensitive your lens is to light. This ties in with the above two, but for me, it’s worth mentioning alone. I call myself the queen of noise- many of my final images have a flaw, at least to me: they’re noisy! You ever notice the dull but colorful “fuzz” in some photos that were taken in low light? That’s noise, and with many of my weather images having been shot at night, I’m still learning about reducing noise. One of the major keys is to work on a low ISO and adjust your other settings to compensate for the slow “film” speed. Sure, you might have to finagle it a bit, but once you’ve nailed your ISO settings- it makes an enormous difference.

4. Always. Carry. A spare. SD card. Always. Carry it in your camera bag, or anywhere that isn’t inside your camera. Seriously. This is probably the most important tip I can give from personal experience. One time, I drove 45 miles out into the nothingness of the desert for a beautiful lightning storm only to be infuriated to discover my SD card was not in my camera. A few of my friends jokingly bought me several extra cards that year as a gift. Thanks, guys.

5. Always, always, always make sure your battery is charged. Always!! You never know when you’ll be on the move and you’ll need your camera. There’s nothing more disheartening than discovering your battery has 14% juice left and you’re shooting a wedding for the next five hours.

Connect with Tori O’Shea on Facebook
View her art at DeviantArt and RAW Artists
Buy Prints: To purchase Tori’s art, just contact her through Facebook or email her at copperstatestormchasing[at]yahoo.com.

Easy Burlap Wreath with Corsage Style Ornaments

Burlap or jute wreaths are so easy to make! You can dress them up, or leave them casual–and decorate them for any season. Here are examples of my two most recent creations, along with the steps so you can hang one on your door today.

 Mother's Day Wreath by rlc

This one was made for Mother’s Day.


Autumn Burlap Wreath by RLCThis one was a “No-Sew, No-Glue” burlap wreath makeover. I wanted something more full.


Materials:

Wreath Form
Burlap or Jute Garland (or your former No-Sew Wreath)
Ribbon (optional)
Floral Wire
Wire Cutters
Corsage Style Ornaments (instructions posted on October 16, 2014)

Steps:

Prepare your materials:

Garland and Ribbon:

Decide how many strips of material you will want to use; the one pictured has three strips of burlap and one strip of decorative ribbon. To measure the length needed for each strip, hold the material against the outside edge of your wreath form and wrap the material around it at least 1 ½ times. This will give you enough extra fabric to “poof.”

Floral Wire for Securing Garland:

Measure out a few strand of wire to be readily available. Basically, these just need to be long enough to wrap around the thickness of your wreath form. Give yourself enough extra to allow for easy twisting of the ends—you can trim off any excess once the wreath is finished.

Create Your Wreath:

I began by taking apart my original wreath; this was easy as I created it with the idea of changing it with the seasons—it was just a matter of untwisting some wire. I’ll be using the same process to make this new version.

Gather the ends of your fabric strips, hold them against your wreath form, and secure with a wire twisted in the back like a twist tie. Autumn Burlap Wreath Start rlc

Now it is just a matter of playing with the fabric; securing it at the end of each section with a twisted piece of wire.


Once you’ve finished the body of your wreath, it’s time to add your decorative elements. I’ve used some corsage-style bouquets created by taking apart elements of floral stems and re-securing them with florist tape. These little bouquets are on florist wire. To attach, simply place the bouquet against your wreath, between two of the “poofs,” and wrap the wire stem around the wreath. Finish by bringing the end of the wire back around your bouquet and pinch it closed. Floral Tape Tutorial 006 rlc


Take a good look at your wreath—play with the fabric, adjusting the “poofs” so they cover the twist ties. Once you are happy with the result, turn the wreath over and trim off any excess wire. Autumn Burlap Wreath Back rlc

DIY Create Unique Florist-Quality Arrangements For Less Than Half The Cost

WhetherDIY mini greenhouse arrangement by rlc 
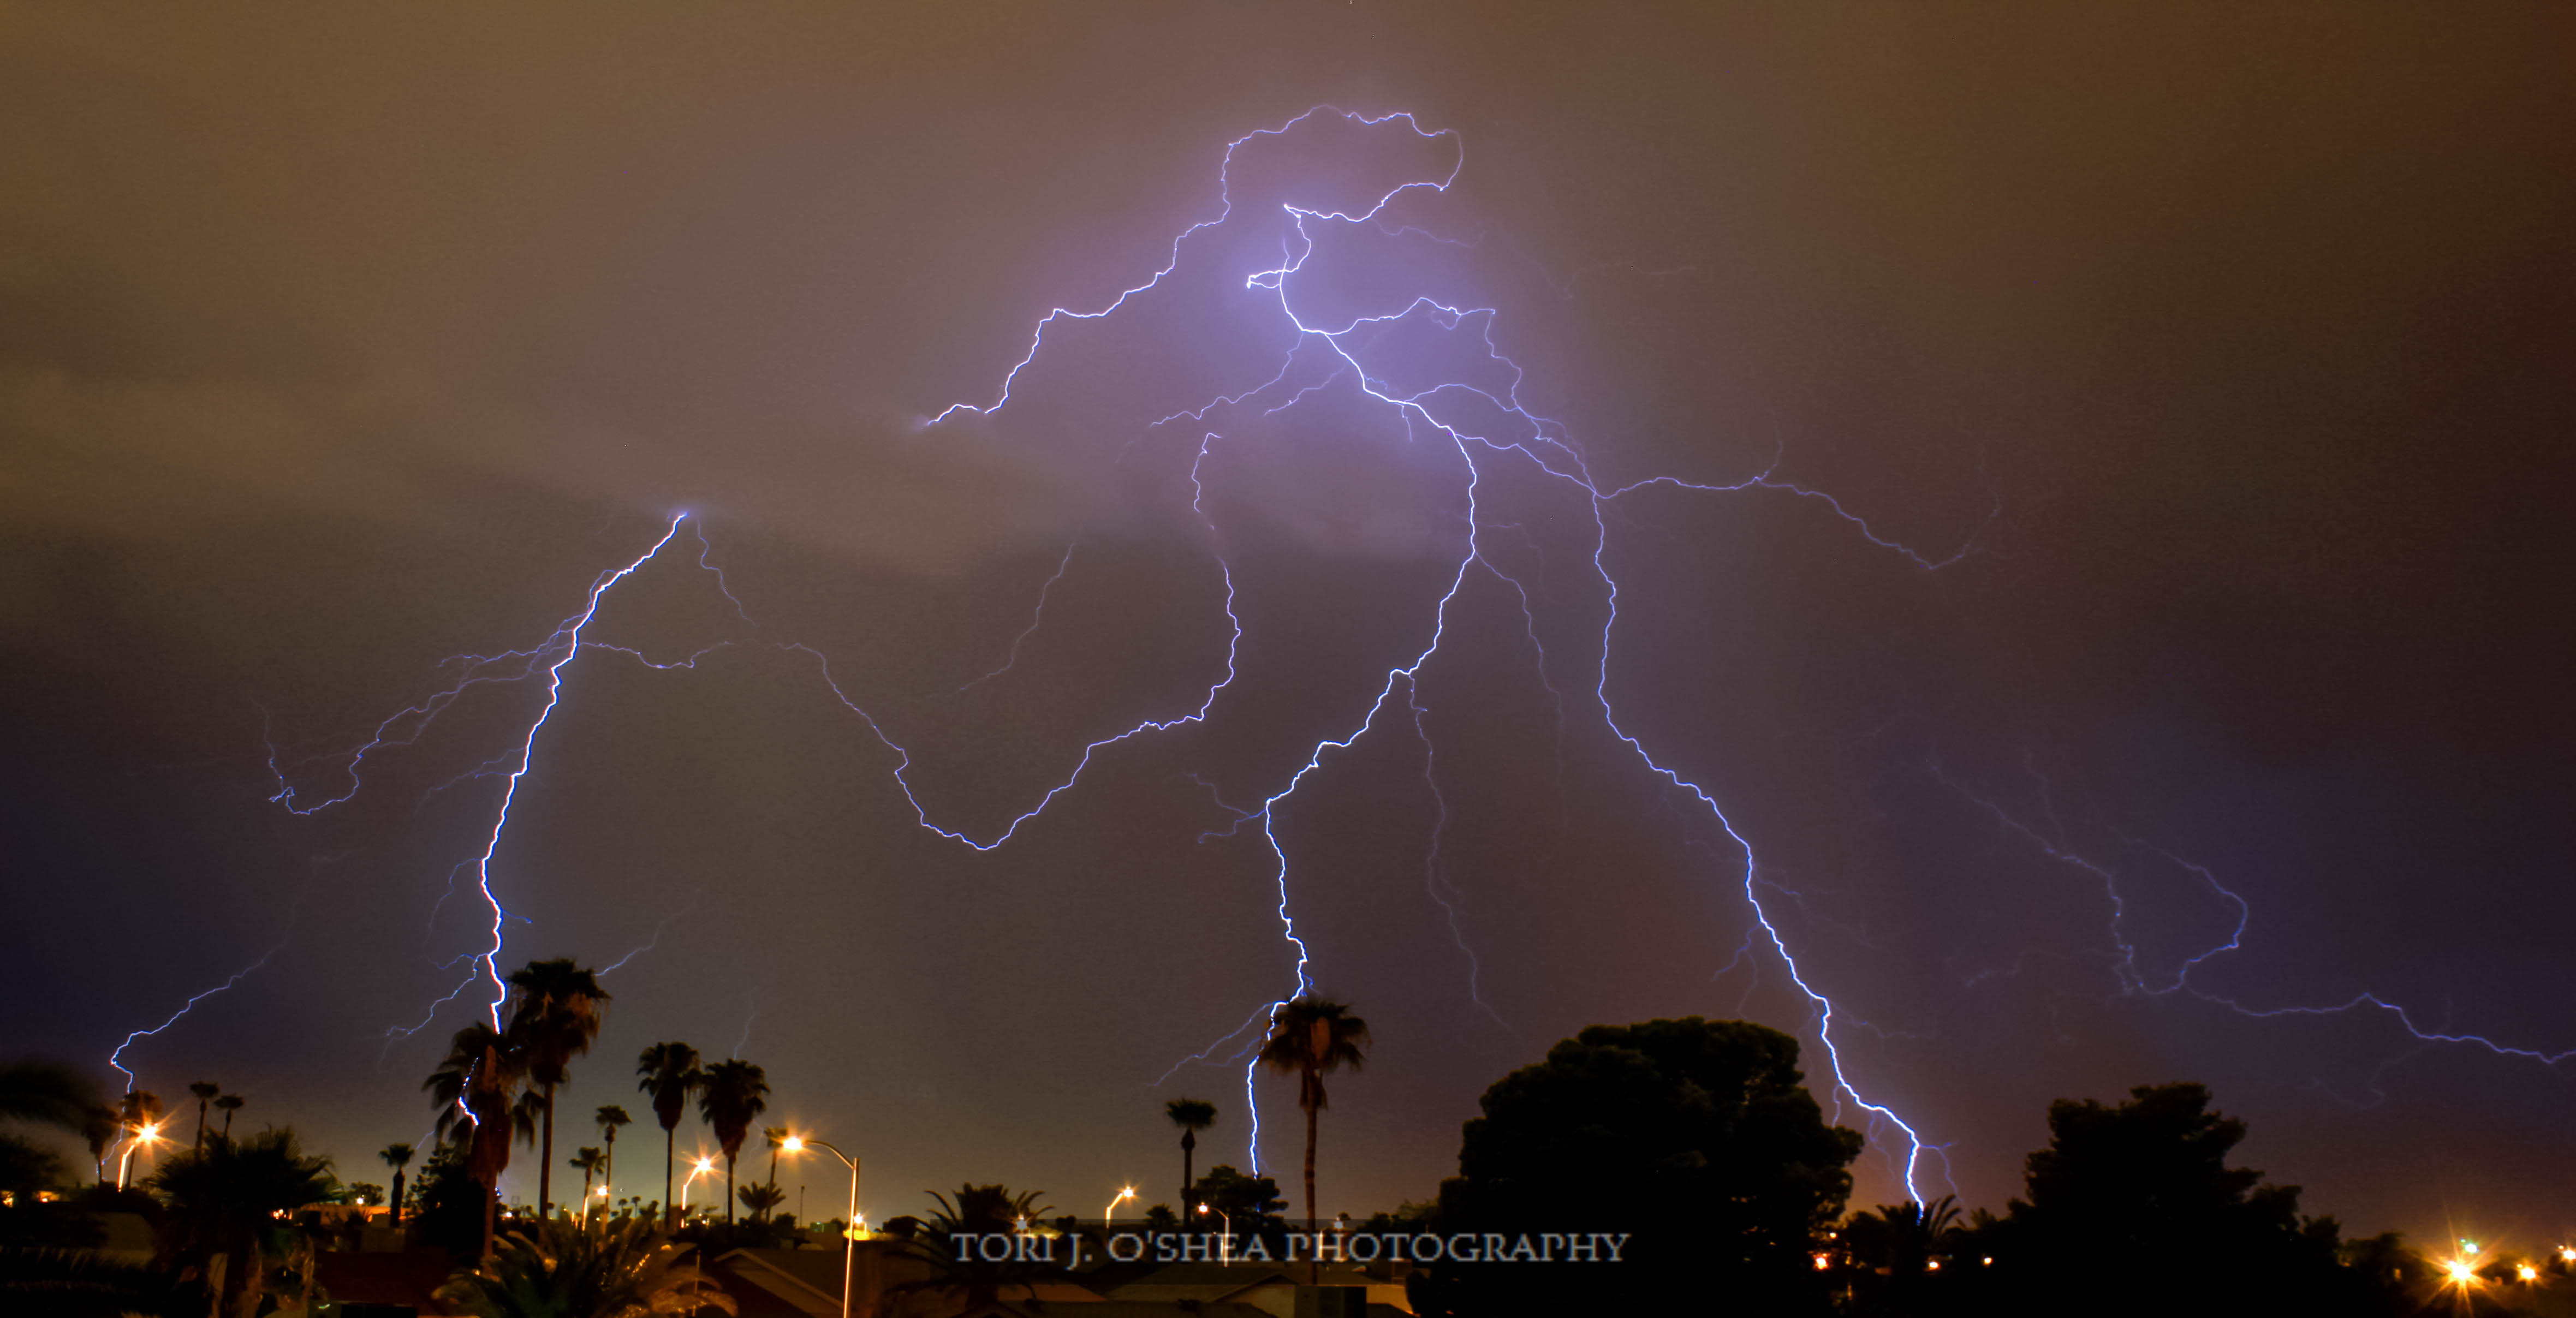
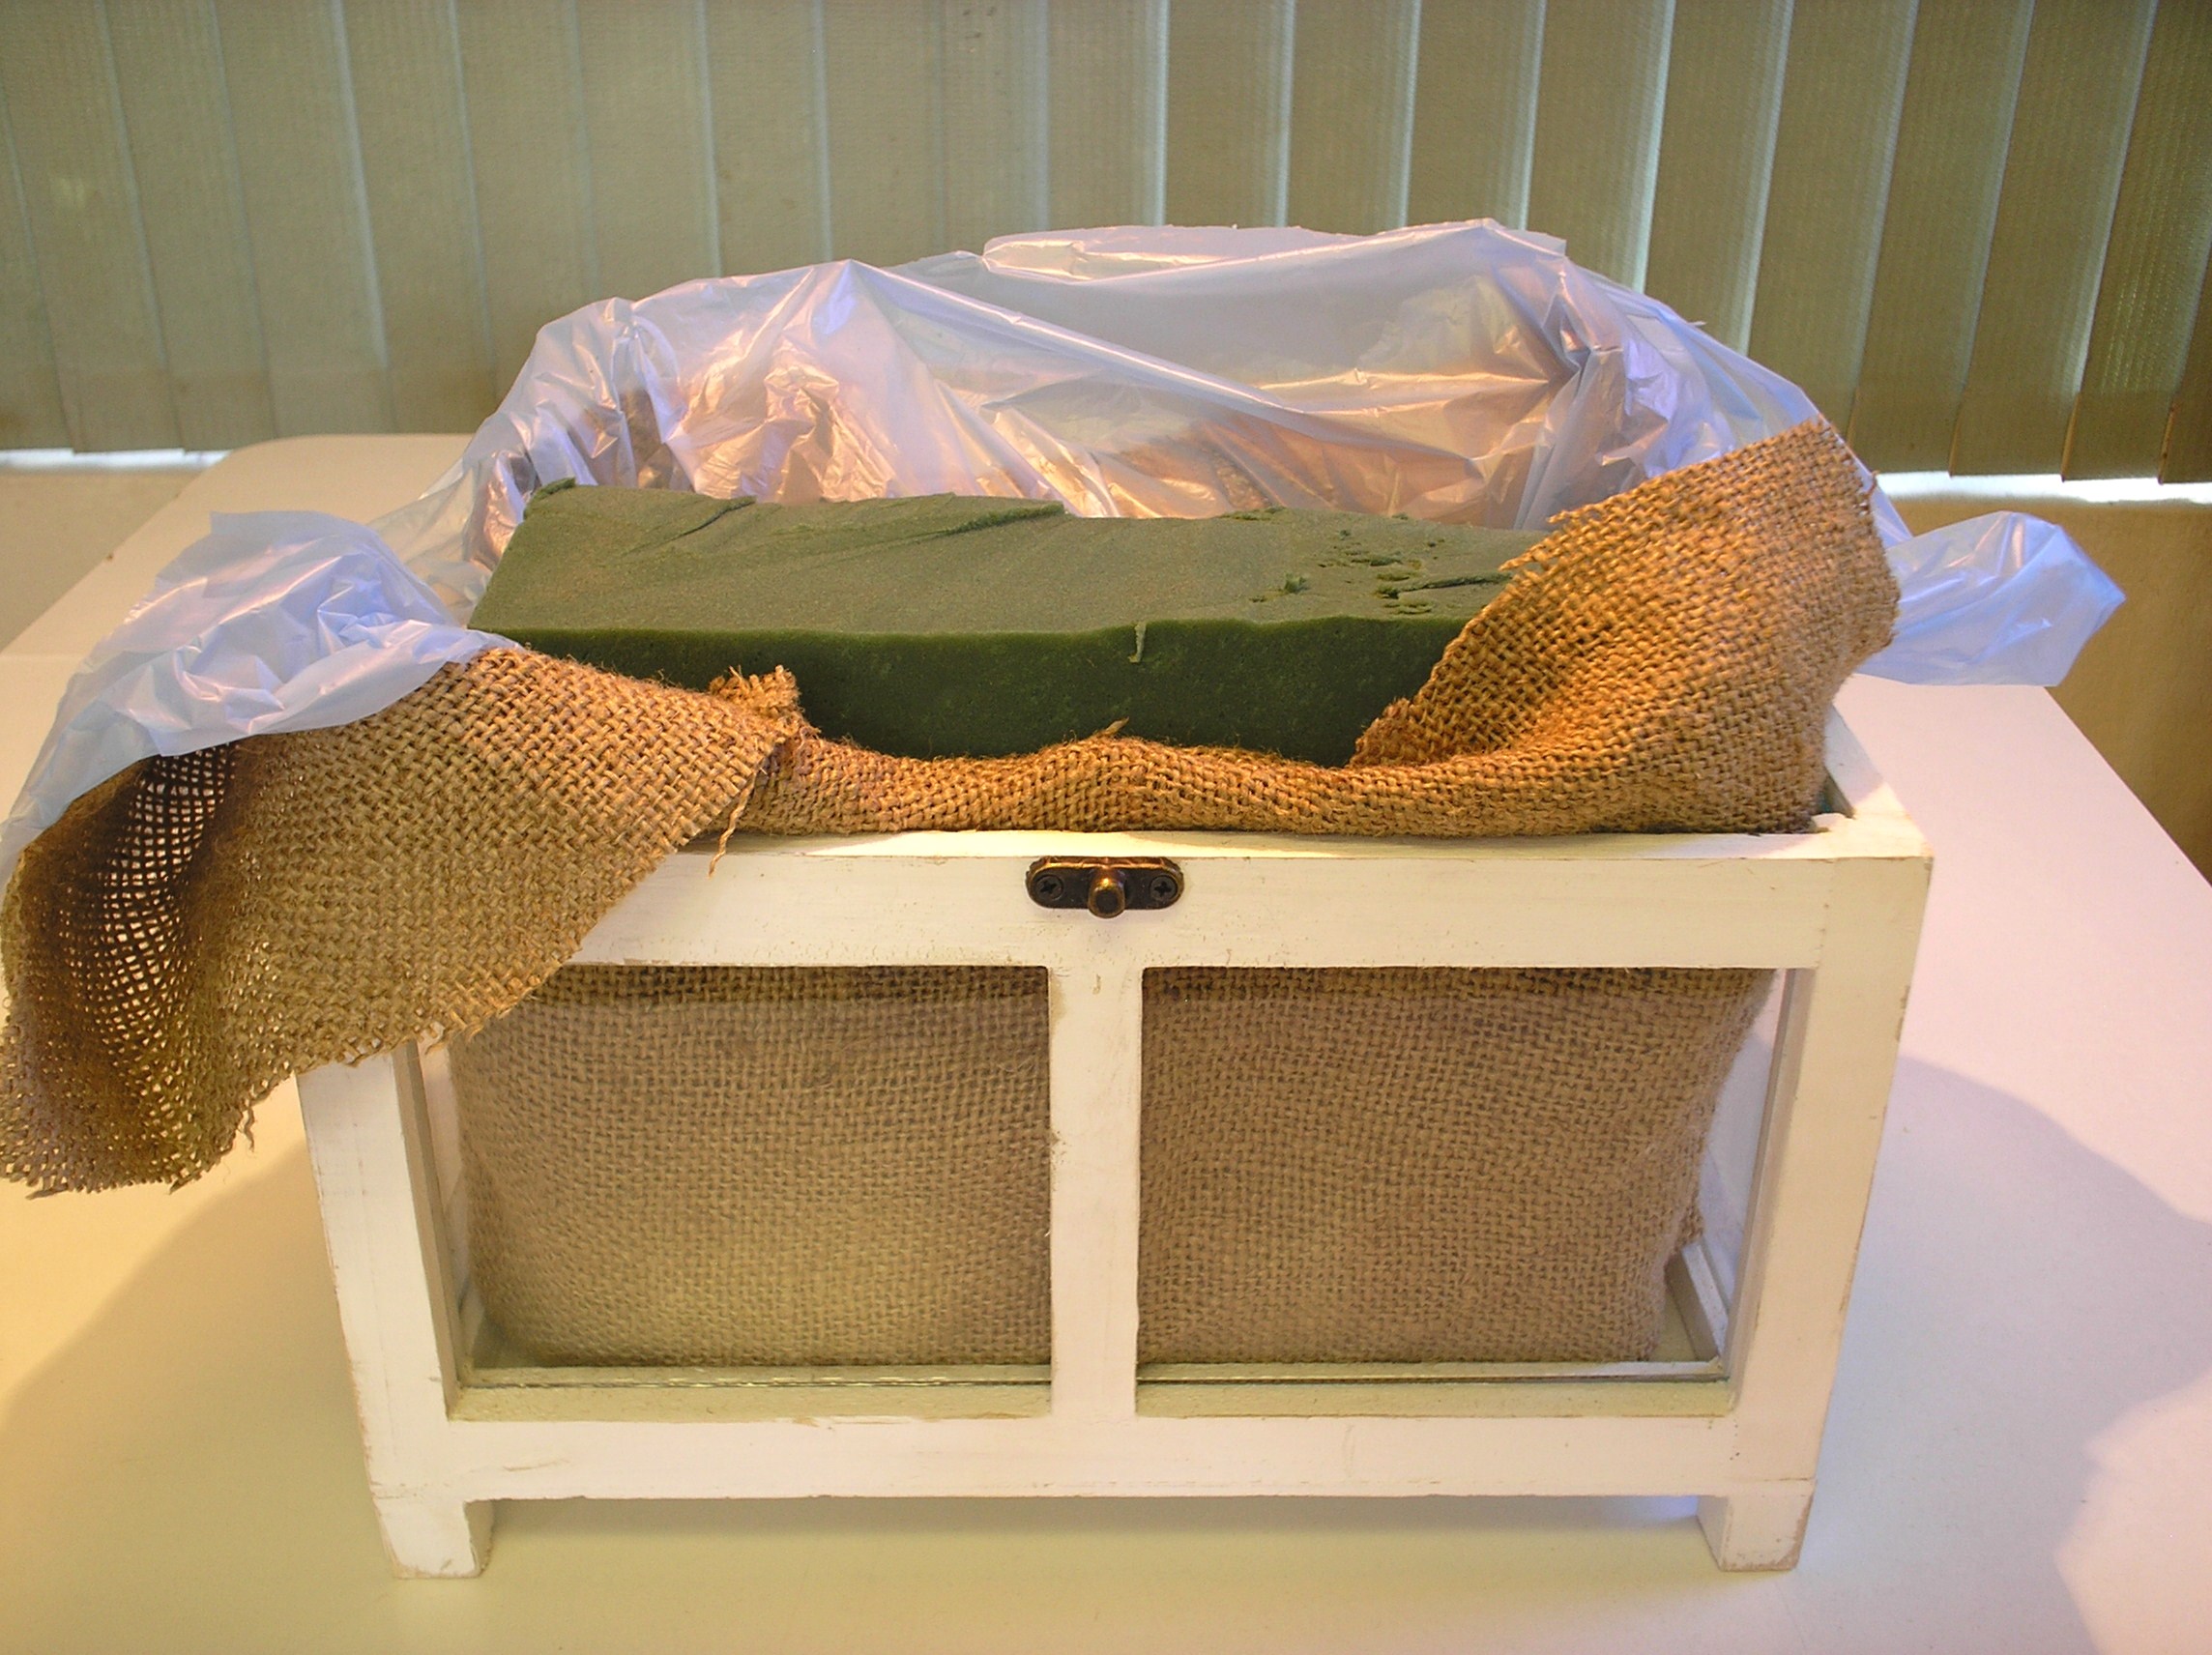
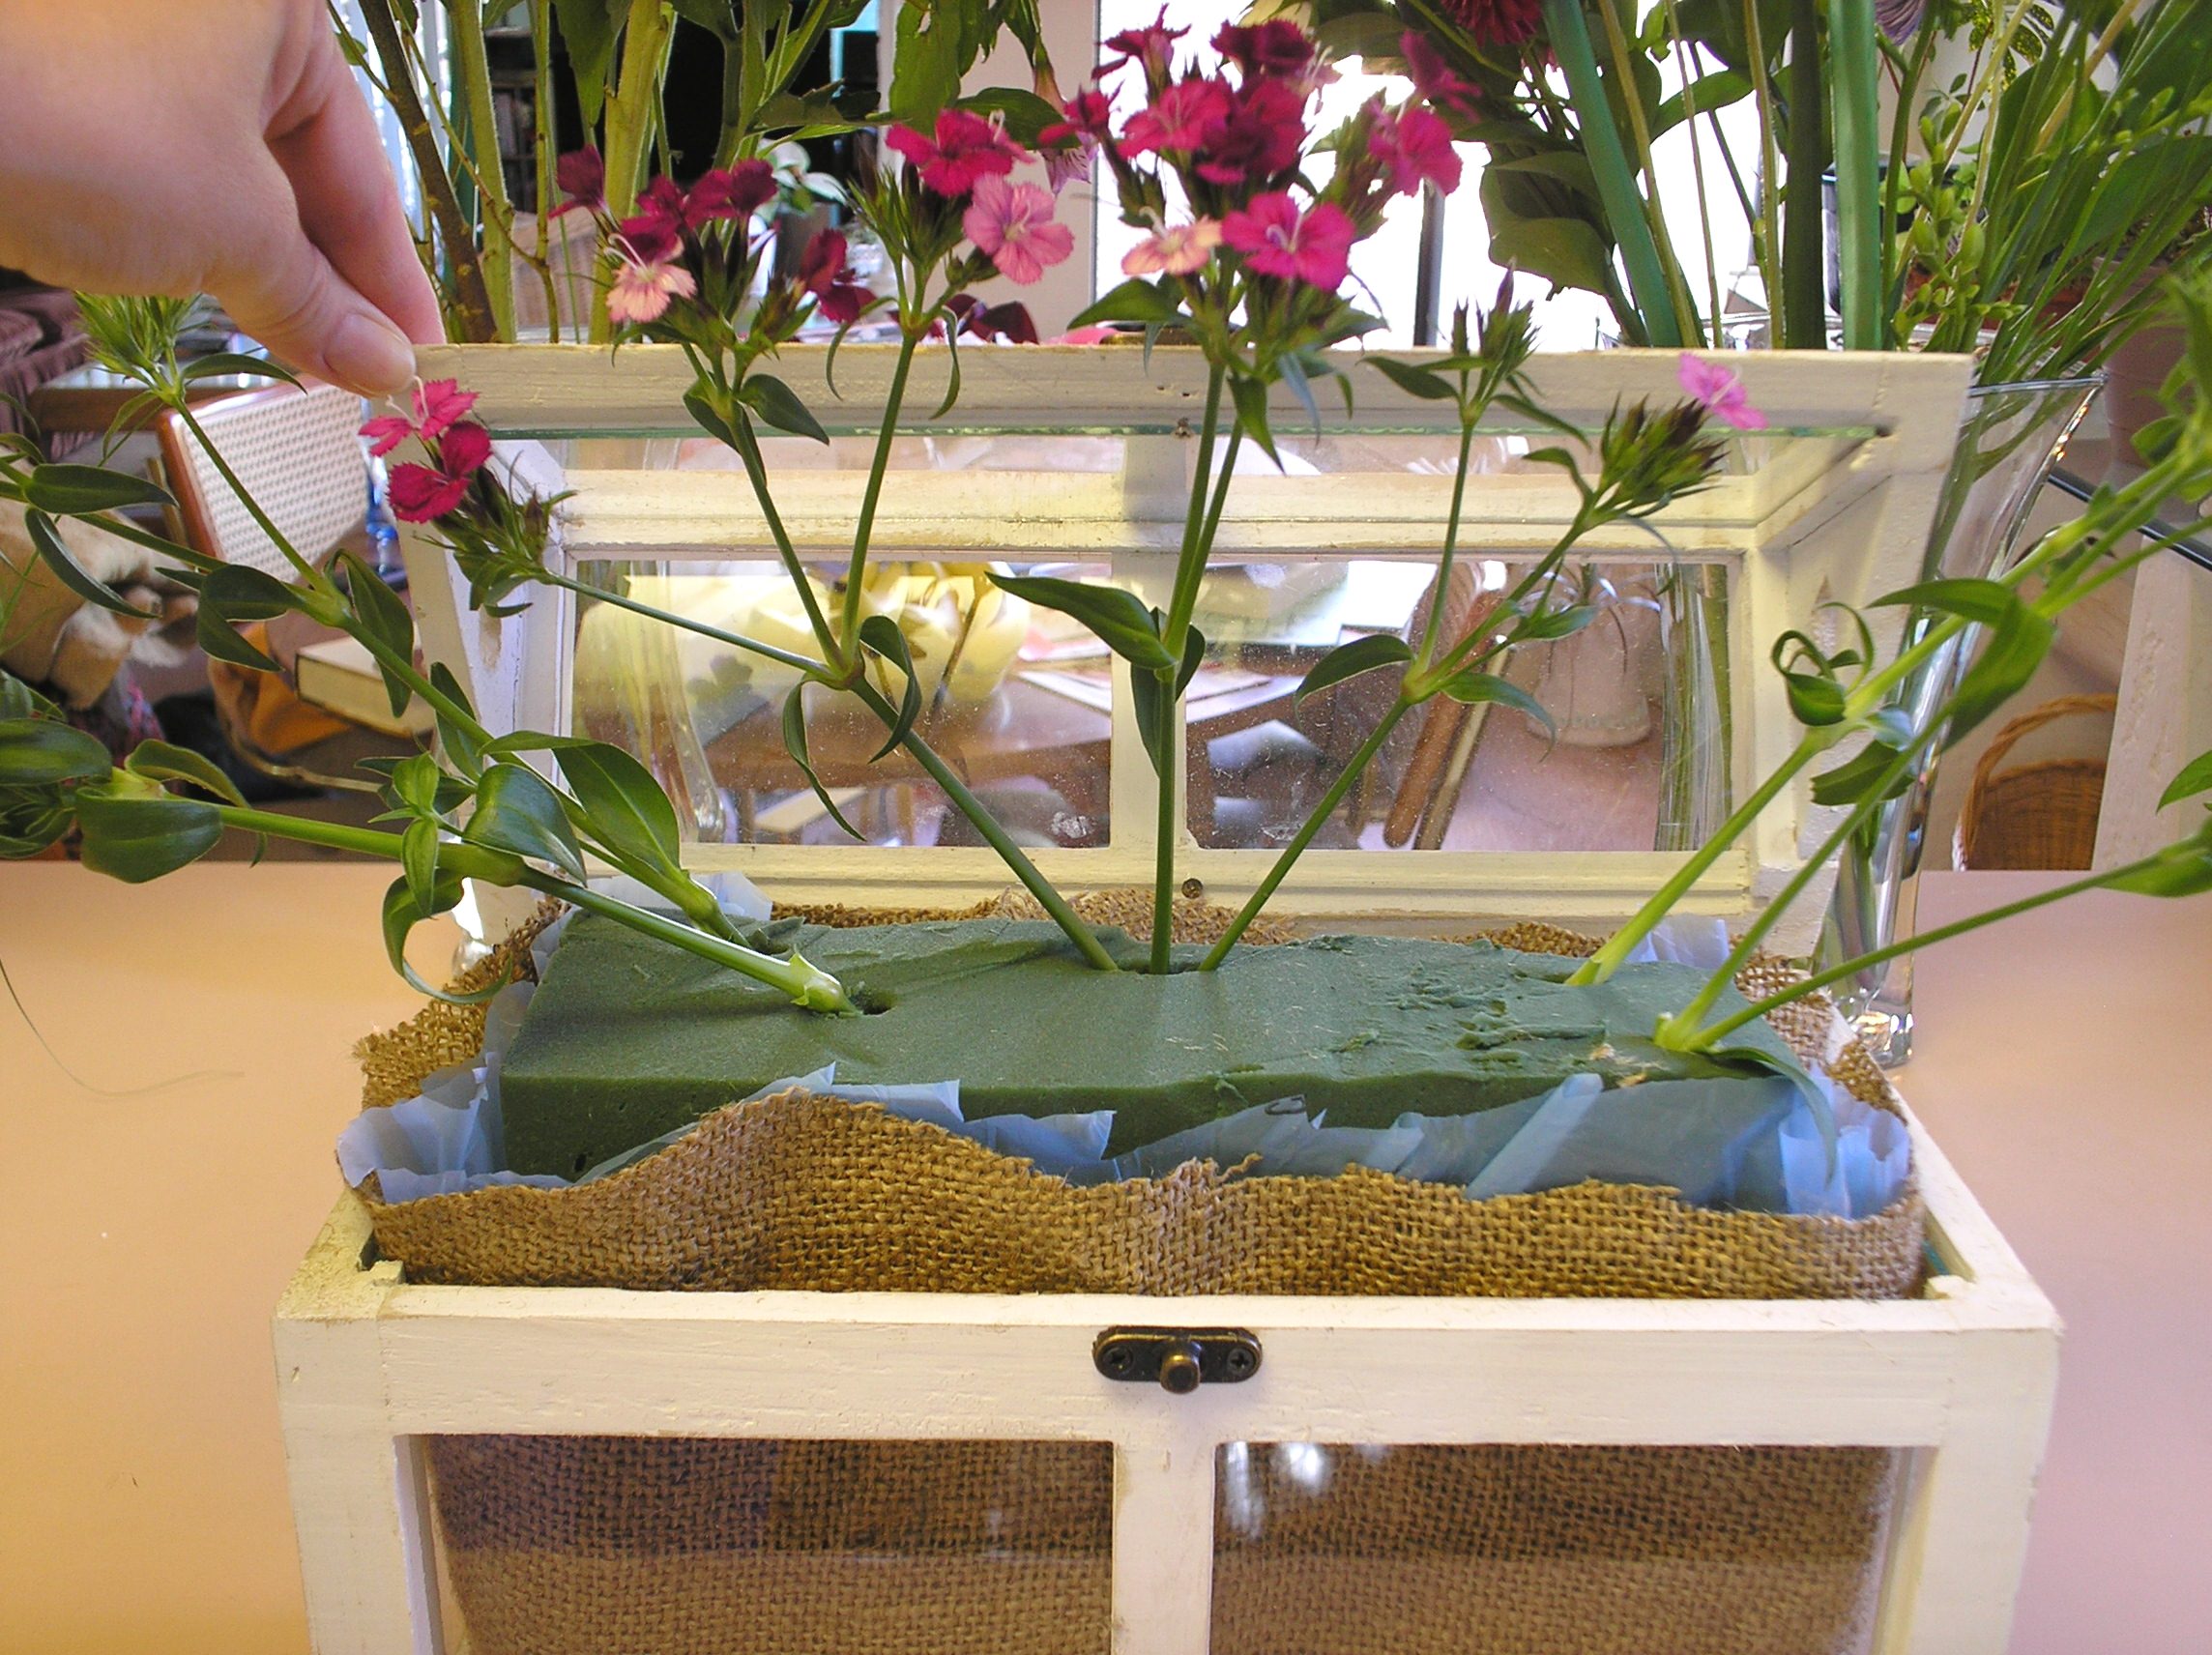
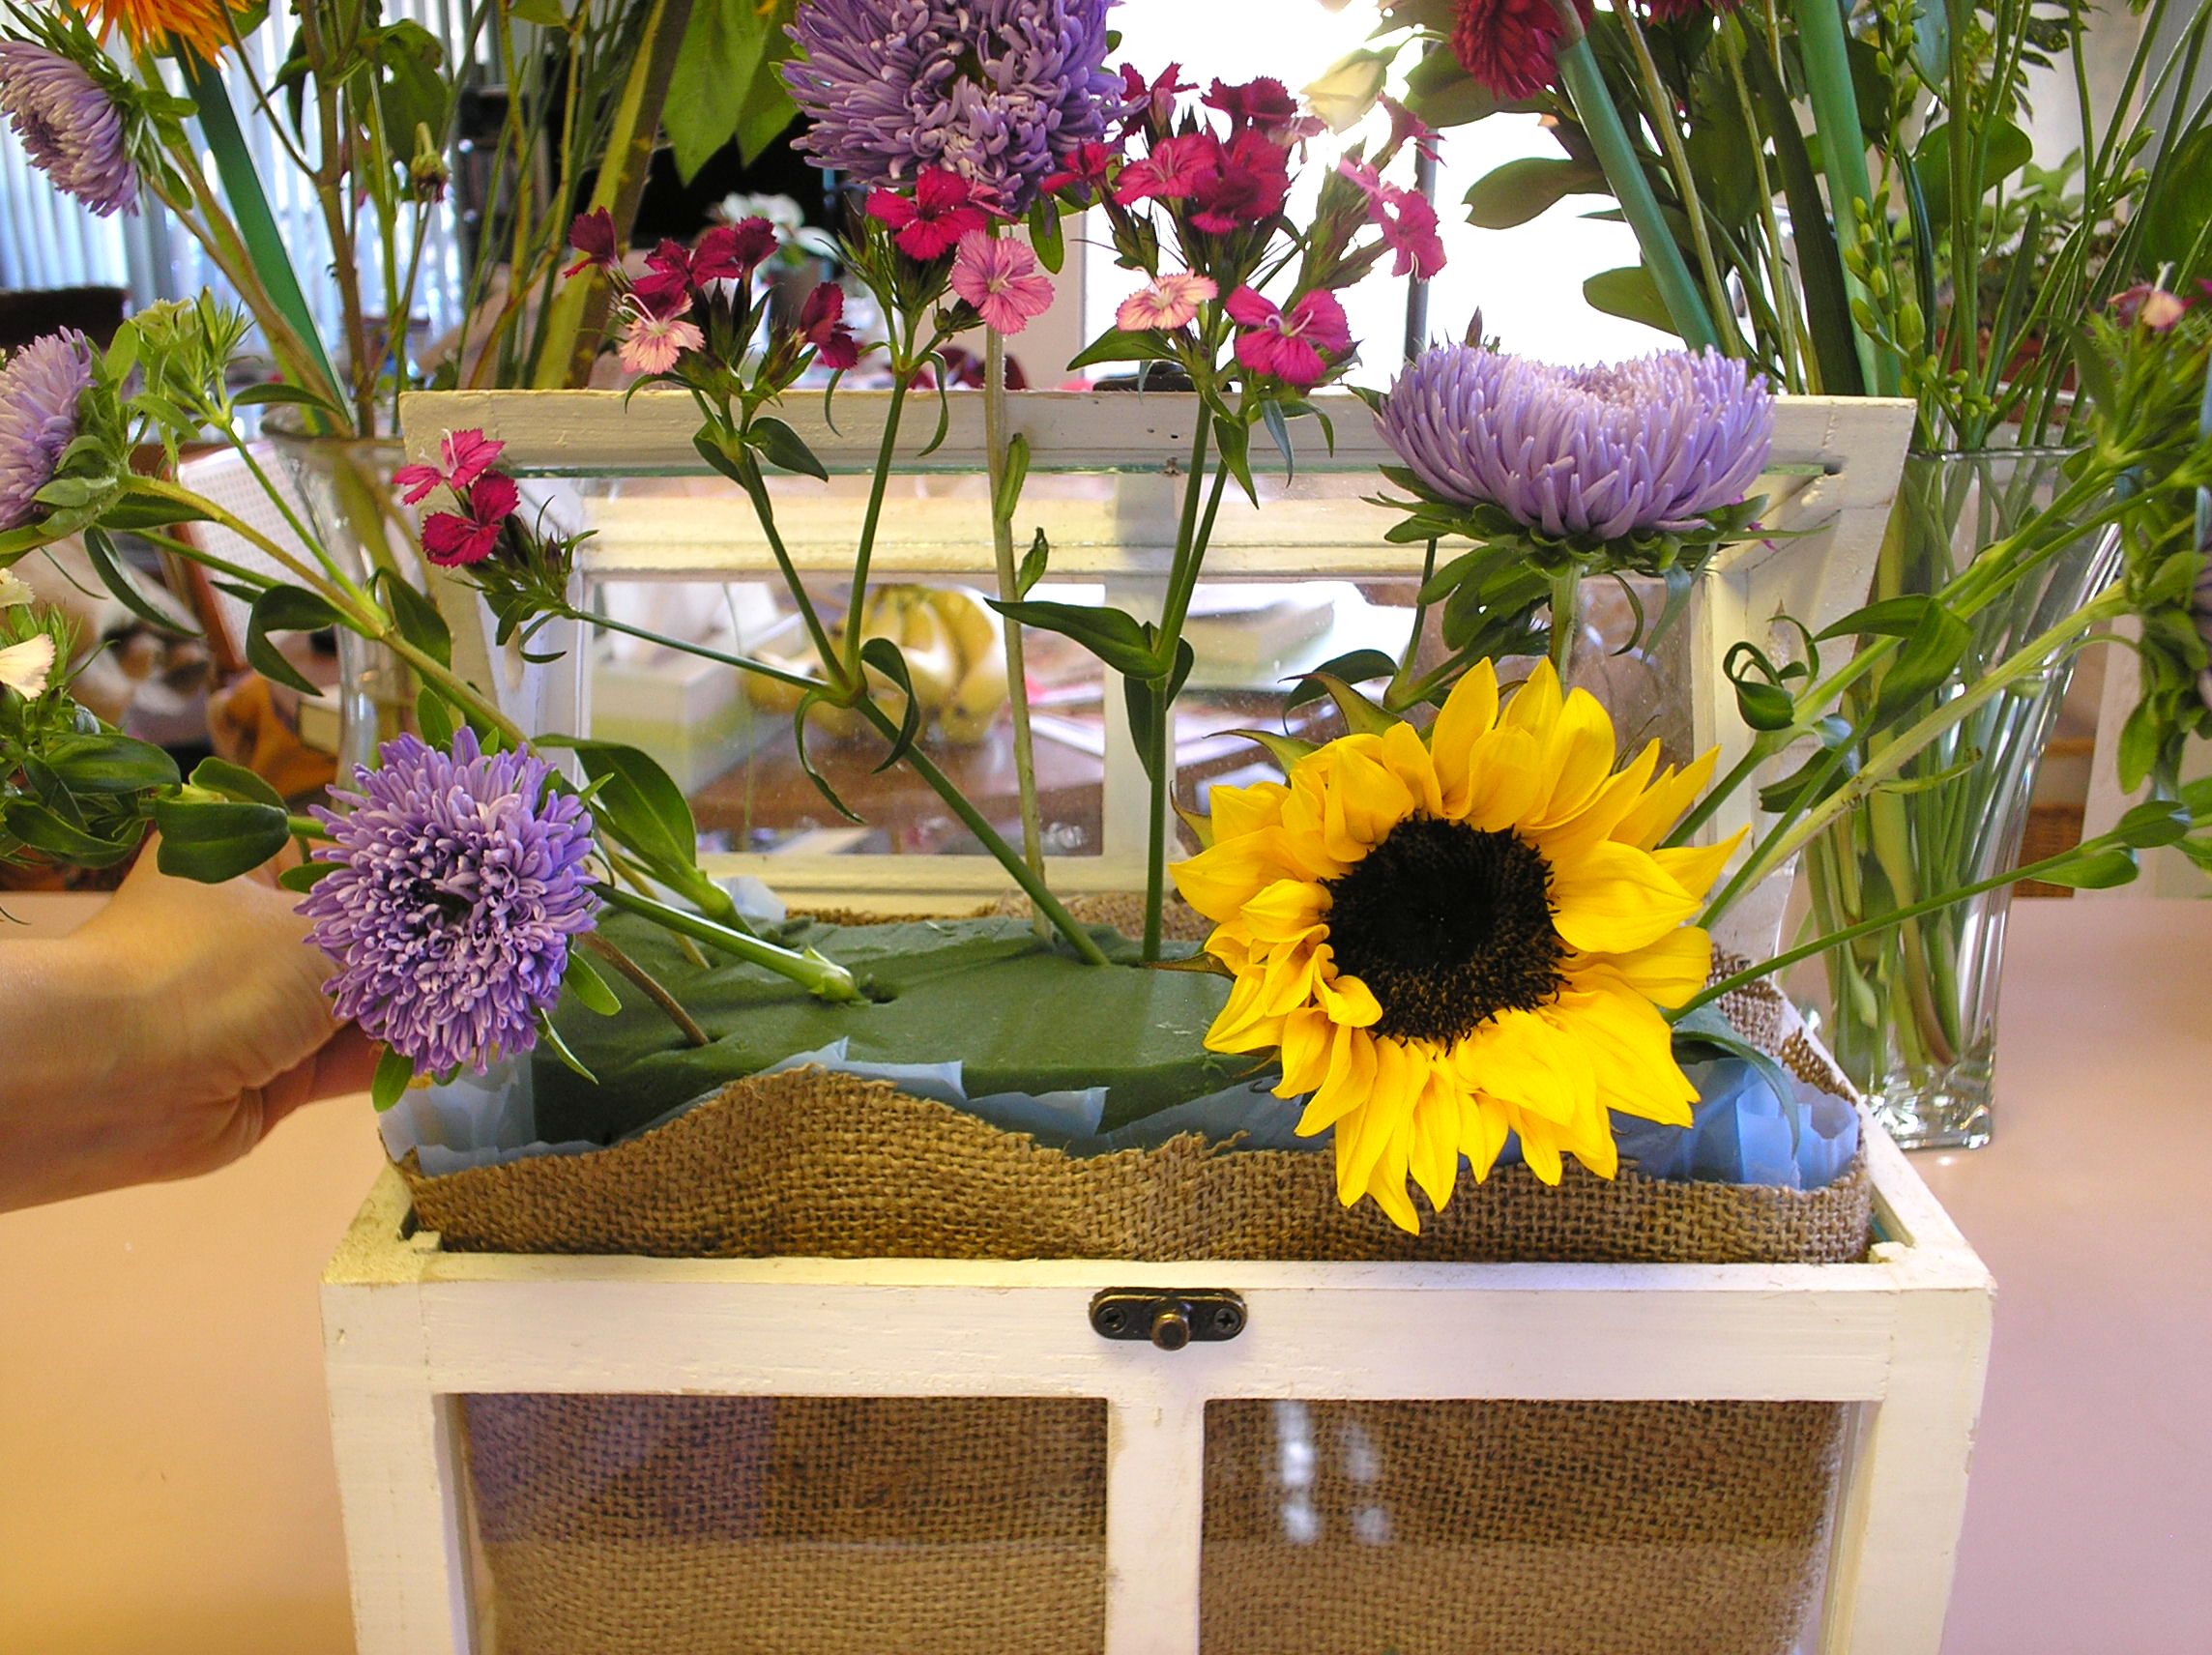
in the pages of a glossy magazine or the window of a boutique florist, at some time you’ve spotted a gorgeous flower arrangement you’ve wished was sitting in your house. What stopped you, was it the price? Today I’ll show you how to create a stunning flower arrangement for less than half of what it would cost at your local florist shop!

I’m using a mini-greenhouse terrarium purchased at Jo-Ann’s, but you can easily substitute any container. The tips I’m sharing are from my own experience working at a florist shop where I was responsible for creating all the FTD arrangements. I’ll start us off with a list of supplies in just a moment, but first let’s talk about flowers and greenery.

A florist will often begin her arrangement by placing a fair amount of “filler” such as greenery or baby’s breath. This is done to cover the sight of the floral foam, take up space, and reduce the number of “showy” flowers used in the arrangement. The problem with this is that sometimes the “filler” can impede the desired placement of your main stems. Although you can simply pull out the filler to insert your flower, this can potentially leave holes in your foam, which could expose your flower stems to air. For this reason, I usually begin with my flowers and insert filler at the finish.

When choosing your flowers be sure to include various sizes and textures. You’ll want some single stem flowers (flowers with one long stem such as Carnations), some clusters (several blooms on one stem), some flowers that can “drape” (such as Freesia), and small flowers/greenery to tuck into any gaps. Here’s a tip for you—you might have all the “filler” greenery you need right in your own yard! Don’t be afraid to use trimmings from your own bushes.

The general rule for creating an arrangement in proportion to your container is to have the flowers equal to the height of your container, and 1 1/2 times the width. So, if my container is 6” high x 4” deep x 10” long the flower arrangement should be about 6”-8” at the highest point and drape over the edges 1” front and back and 2” or 3” on each side. Ready to have some fun?

You will need:

Container
Flowers
Wet Floral Foam
Florist’s blade or clippers
Craft blade to trim the foam
A bucket for soaking the floral foam
A bucket or vases to hold the flowers while working.

Optional:
Floral Tape to secure the foam
Plastic Bag to use with any non-watertight container
Decorative Cloth to use with a see-through container
Twine to secure the lid (if using a mini greenhouse)

Steps:

A few hours before working, or even the night before…

Unwrap your flower bouquets, trim a bit off of the stems, and place them in a bucket or vases to allow the flowers to perk up after being compressed. This is a great time to use the little flower-food packets included in the wrapping.

Soak the floral foam in a bucket of either plain water or water with flower food added. You can either measure the foam and trim prior to soaking, or trim it after it is fully wet. Once wet the foam is very easy to cut through.

Prepare the container…

We are ready to create our arrangement. Since my container is glass, I’m going to start by placing some burlap in the greenhouse. Next, since my container isn’t watertight I’m adding a plastic bag. mini greenhouse arrangement by rlc

Now we can insert our floral foam. The floral foam is merely a tool for holding the flowers in place so it doesn’t have to fill the entire container. In fact, you want to leave room for the water. To keep your foam from shifting, you can either place florists tape across the top in a “+” pattern or simply cut a few small squares of foam to wedge in on the sides. Be sure your foam sits a bit higher than the container so you have someplace to insert the flowers around the sides—a couple inches is fine. Add a bit of water to keep your foam wet while you work. At this point I’m trimming away the excess burlap and plastic.

Creating your arrangement…

The general rule for floral design is to keep the eye moving in a triangle. This rule can be bent depending on your container, but the key is to keep the eye moving from bottom to sides to top. This is done by using either the same flowers, flowers of the same color, or the same type of flower in similar colors. We’ll call these your main stems. In addition to your main stems, you might want to choose one or two large blooms as your focal point. Large focal blooms are usually placed low in the arrangement or even resting on the rim of the container. The objective is to make the container part of the artistic expression; you don’t want it to look like your arrangement is floating above the pot. “Draping” flowers, such as Freesia, help to blend the container into the arrangement.

Note: When using foam, flowers are trimmed and arranged just as they would be for use in a vase. You want your stems to reach to the bottom of the foam where the water is. Never enter your stems horizontally. Make your stems as long as possible. mini greenhouse stem position by rlc

Let’s begin by using a few of our cluster stems to map out the proportions. At this time you can decide if there will be a back side to your arrangement. Place one tall cluster stem in the center (or the mid-back if your arrangement will be against the wall). Next, place stems of the same flower so they reach out to the edges of where your arrangement will end on all sides. The objective is to create the “bones” of your triangle.

For those of you using a greenhouse like I am, our focus is mainly on the front of the arrangement. Since we plan on propping the lid up, let’s make sure the flowers in the back are placed far enough towards the center to be out of the way of the lid. mini greenhouse mapping size by rlc

Once you have an idea of the shape and size of your arrangement you can begin placing your main stems. It’s always more pleasing to the eye to have two or more of the same flower placed together. So, if you want the eye to follow purple mums, for instance, place two or three mums at each side and a few at the highest point. You might also place some at the mid points between these.

Next, place your focal flower(s). I’m using a sunflower. A focal flower is usually set off-center. mini greenhouse flower placement by rlc

Now you can fill in with the other stems. Remember to place more than one stem of a kind together. Vary the heights of the flowers to create depth. You’ll want to place the blooms so that they cover the stems of other flowers. This is especially true along the edges where you want the arrangement to blend with the container as a single artistic vision.

Your arrangement is almost finished. At this time, let’s fill in any blanks with our filler and greenery. Basically, you’ll want to cover any place where you can see floral foam or stems.

For those of you using a greenhouse, trim a few short pieces of greenery to cover the foam in the back. They should be short enough for the lid to clear the tops. We want anyone looking through the glass lid on the back of the arrangement to see plant material and not floral foam. mini greenhouse backside by rlc

At this point we can prop up our mini greenhouse lids. Thread one end of your twine through latch on the lower box and tie a knot. Pass the twine up through your flowers and tie it around the hook part of the latch on the lid. Continue to use your “filler” stems to conceal the twine.

Tada—you’ve created a masterpiece! mini greenhouse arrangement finish

It’s so rewarding to make your own floral arrangements. First, it’s fun to watch your own skills increase. Your friends will absolutely love receiving arrangements you made yourself. And, you can finally decorate your home like those pictures in the glossy magazines–for less than half the cost of professional floral design! I worked the figures and determined that this arrangement would have cost $162.50 at the shop where I used to work—the DIY price was a mere $45.00.

mini greenhouse side 1 by rlc  mini greenhouse side 2 by rlc

Sneaky Art Book Review and Double Giveaway!

When we get right down to it, most of us create so we can share…smiles, joy, and beauty. Quick, easy crafts not only feed our desire to create and spread smiles, they also relieve stress by giving our analytical mind a break. Today I’m sharing a little book that makes it oh, so easy to sneak a bit of art time into your day—no matter what your age. The book is Sneaky Art by Marthe Jocelyn. I’ll be passing my copy on to one lucky winner–along with an extra prize—but first, let me tell you about the book.

MarthebookcoverSneaky Art: Crafty Surprises to Hide in Plain Sight is intended for ages 8-12 but appeals to sneaky artists of all ages. The projects are inexpensive and easily adaptable for large groups, making it a good resource for teachers, but the true beauty of the book lies in the underlying lessons in conceptualization and material re-purposing. For instance, can you make a boat using only the items in the recycle bin? Jocelyn uses wine corks or milk carton bottoms…what else could you use? What can you do with cupcake papers other than cover cupcakes? How about making them into fortune cookies!

Each of the twenty-four projects in Sneaky Art are presented in a simple format listing materials needed, craft instructions, suggestions on where to “sneak” your art, and pictures of the finished pieces in their “sneaky” locations. The author offers clear instructions that “Sneaky Art is not mean, defacing, ugly, hurtful, messy, or permanent. Sneaky Art is not graffiti or marking up someone’s property. Sneaky art is funny clever, thoughtful, subversive, playful, and surprising.” Jocelyn even suggests going back to the scene of our “sneak” and retrieving our art if it is still there. To this I will add my own suggestion that any art placed outdoors be created with good stewardship in mind. We don’t want to create litter, and we don’t want to endanger any wild life. So, any paints should be non-toxic. Do not use thin threads or fishing line as they can wrap around the feet of birds and small animals causing injury. Do not use colored beads or fake berries as birds may ingest them and get sick (or worse).

Would you like to win a copy of Sneaky Art? Details on how to win today’s special double giveaway are at the end of this post.

About the Book:

Sneaky Art: Crafty Surprises to Hide in Plain Sight By Marthe Jocelyn

  • Age Range: 8 – 12 years
  • Grade Level: 3 – 7
  • Hardcover: 64 pages
  • Publisher: Candlewick (March 26, 2013)
  • Language: English

Synopsis:

For young artists, tricksters, and crafters, here is a hip, friendly how-to manual for creating removable and shareable art projects from easily found materials. The sneaky part is in the installation! Each work of art is custom-created for display in public places — a tiny cork-bottomed boat in a public fountain, a plate of tiny paper cupcakes on your teacher’s desk, a penny left on the ground for a stranger, a funny message left on your mother’s bathroom mirror, and more. This utterly unique guide — part craft book, part art-philosophy — offers a stylish and sweet “made-you-look-twice” spirit of fun meant to put a smile on the faces of strangers and loved ones alike.

About the Author:

Marthe Jocelyn spent her childhood in Toronto reading books and putting on plays and circuses in her backyard. Marthe has a long string of jobs: theater usher, cookie seller, waitress, photo stylist, even toy designer before she finally settled on writer. She currently lives in Ontario with her daughters Nell and Hannah.

Marthe Jocelyn’s websites:

http://www.marthejocelyn.com/index.htm

http://sneakyart.com

Twitter: @scissorhouse

#SneakyArt

Double Giveaway!

As part of the Sneaky Art virtual book tour through Women OnMarthebookcover Writing, I am offering a double-prize package consisting of my hardcover, review copy of Sneaky Art and a Rainy Day Art Pack by Marthe Jocelyn.

The Rainy Day Art Pack comes with a body template and a selection of scraps for crafting (decorative paper, pompoms, feathers, yarn, buttons, etc…) Just add glue and scissors! More fun than paper dolls (remember them?) Where will this little character end up? He/she might become part of a collage…or even take part in a “sneaky art” caper!  Rainy Day Artpack

To Enter The Giveaway:

Leave a Comment: Tell us about a time you took part in a sneaky art caper OR tell us about something wonderful you or your child created with re-purposed items OR tell us why this book appeals to you. Make sure your email address is either in your profile or included in your comment so I can get in touch with you!

For additional Entries:

Tweet about this giveaway. Come back and leave the url to your tweet. Be sure to use the hashtag #SneakyArt in your tweet! (Each tweet gains an additional entry!)

Follow @scissorhouse on Twitter (and let us know)

Follow @RCchrps (that’s me) on Twitter (and let us know)

Visit A Ponderance of Things on Sunday, December 15th for more chances to win this Double Giveaway!

Contest runs December 13, 2013 through December 21, 2013. One random winner will be chosen from all entries gathered on Museiddity and A Ponderance of Things. One winner will win the prize package consisting of one hardcover copy of the book, Sneaky Art, and one Rainy Day Art Pack. Items to be mailed separately. Winner to be notified by email and posted in a blog update.

Good Luck!

Update: Congratulations to Pillows-a-la-mode for winning our Sneaky Art double prize! She has been contacted via email 🙂

What’s on Your Craft Bench?

On the Workbench by rlcI thought I’d take a moment to share some of the of the things I’ve been working on and invite you to share your own projects.

Lately, I’ve been in jewelry mode. I decided to create some resin pendants using Halloween-themed pictures I drew a few years ago. It’s fun to take the original illustration and use photo editing to apply different techniques–each pendant comes out unique!

Red Flight bracelet by RLCJust to show the difference, here is a picture of bats flying with the moon in the background. But in one version the moon seems to be bleeding (and has an extra bat), the other (in the picture below) is more sepia toned.


On the Workbench Items by rlc

I reverse-painted some clear pendants and ended up with some really neat effects! I especially like the blue one (in the picture here), but there was a lovely, shimmering lilac colored pendant that became the focal for this necklace.

Creations by RLC widget pic

I’ll be adding the finished projects to my shop as I go along. I just recently added these two. One is original artwork in resin, the other is a Dia De Los Muertos lariat necklace featuring hand-formed and hand painted clay skulls. Passkey and Los Muertos by RLCby RLC

So, that’s what’s on my bench right now–what’s on your bench? Are you making crafts for Halloween or stitching gifts for Christmas? Are you trying something new? Do you have a craft to share? Let us know!


Create an Eerie Gallery of Illuminated Picture Boxes

Illuminated Picture Boxes for HalloweenBe the curator of your own ghostly museum! These DIY light boxes are a fun way to light up your hallway, bathroom, or fireplace mantel.

I shared this craft last Friday with the folks at Samhain’s Sirens but thought it was so fun I’d re-post the craft here!


Craft Materials:

  • Empty boxes—one for each illuminated picture. These will be your frames.
  • Ruler to measure the “window” size for your print.
  • Item to trace for “window” (optional)
  • Vellum for printed picture (about .99 cents at the craft store; scrapbook section)
  • Computer and computer printer for printing picture onto vellum
  • Paint, pretty paper, or other embellishments to decorate frame
  • Craft knife or scissors
  • Tape
  • Glow stick or battery operated light source. (I used the submersible LED lights I talked about in Light Up Your Party. They have a clip on the back to hold them onto the box/frame)


Craft Steps:

Choose an empty box—an empty cereal box or tissue box will work nicely. Tape closed any open ends and cut a large opening out of the back side of the box.

Illuminated Picture Boxes one

Lay the box face down and measure or trace your desired picture window opening (I used the lid to a can). Cut out the opening.

Illuminated Picture Boxes two

Measure your window to determine the needed size of your printed picture. If you will be painting your box you might do this now so it has time to dry.

Illuminated Picture Boxes three

Using your computer, choose a photograph or illustration to print. You might want to manipulate the image using photo editing software. Save the image.

Decide how you will print the image and print a test page on regular paper.

How you print the image depends on your equipment. I use my Word program and insert the image onto a document. The rulers on my screen help me to size the image.

Check your test page against the window you cut from your box. If you are happy with the size then print a final copy onto a piece of vellum. Note: Vellum does not take ink as well as regular printing paper, so be prepared to allow a few minutes of drying time. Your image might have roller lines or other ink imperfections but that just adds character to your final work. (wink*)

Cut out your image allowing enough of a border for taping to the box.

Samhain Greetings by RLC

Place your box front down on a table. Place your image face down inside the box. Check the placement to be sure the image is correctly positioned in the window. Tape the image to the inside of the box.

Illuminated Picture Boxes five

Finish decorating your frame. When the time comes to illuminate your box simply tape a glow stick—those little sticks you break and shake—or a small, battery operated light source to the inside bottom ledge of your box.

Illuminated Picture Boxes Samhain Greetings

I’d love to see your gallery! Send me a note or leave a comment if you want to share your picture boxes with Museiddity readers.

Homemade Clay: Recipe Comparison

Homemade Clay BeadsWith so many clay products available on the market why would you want to make your own clay? Well, beyond the usual arguments of being non-toxic, affordable, and available on a whim (via your kitchen pantry), homemade clay adds a special charm. Having never made clay before, I narrowed my search down to two recipes and decided to do a comparison.

Recipe #1:  School Glue Clay. I found this recipe demonstrated on YouTube by Hectanooga 1.

Ingredients:

1 teaspoon white school glue

1 teaspoon water

1 cup flour (approx.) added 1 tablespoon at a time.

Coloring—food coloring or acrylic paint (optional)

In a small cup stir the water into the school glue to blend. Add your choice of coloring until the mixture reaches your desired hue. Add 1 tablespoon of flour and mix well. Continue adding flour a little at a time. Once the dough begins to stiffen you can take it out of the bowl and work it with your hands.

Continue kneading flour into the dough until the dough is no longer sticky, then work the dough until smooth and no longer “grainy.” Wrap the dough in plastic to rest–about one hour. Once rested, knead again to condition the clay. (You can view a demonstration of this recipe on YouTube.) Homemade Glue Clay

Air-dry your finished pieces for about an hour before baking. Bake at 200-225 for 15-20 min. Turn off oven and let them sit for a few minutes.

(I used acrylic paint for coloring. My items air dried for 90 min and baked on center rack for 20 min.)

Recipe #2: Salt & Flour Clay. This recipe is from Anne Marie Helenstine, PhD at Chemistry.com. Anne offers six recipes; this one stated it was good for hardened sculptures, jewelry, and ornaments.

Ingredients:

4 cup flour

1 cup salt

1 ½ cup water

In a large bowl combine the flour and salt. Slowly mix the water into the dough until dough is ready to knead. Knead until all flour is combined. Bake Homemade Flour Clay in Gallon Bagfinished pieces on non-stick pan at 350 for 1 hour.

(My items air dried for 45 min. and baked for 30 min. I removed them early as they were turning brown)

Comparison:

Clay #1 made small, hand-sized batches. It took some time to knead in enough flour so that dough was no longer sticky. The consistency while kneading was somewhere between Playdoh and Silly Putty. It had a bit of elasticity. I found that moistening my fingers while working helped combine colors (for caning). You could probably sculpt small items with this clay, it’s pretty sturdy.

The “Glue Clay” held color after baking, even the batch made with metallic paint. Right out of the oven it offered a smooth, finished look. This recipe is good if you only want to make small batches, if you want the clay to have a base color, or if you want to skip painting altogether.

Clay #2 makes a big batch—think pizza dough! It took a bit of work to knead in all the flour. This one is rather grainy and doesn’t smooth out as well when working. Although you can make beads and pendants with this clay I don’t recommend it for sculpting unless you have an underlying support–it tends to sag while you’re working. Some of the items began to “puff” up while baking. Once removed from the oven the items resembled crackers.

After baking, the “Salt & Flour” clay retained a rough textured, rustic appearance. I like the way some of the pieces look aged or worn—sort of a funky vintage look. Some of the pieces began to get a little “gummy” while painting but firmed back up when the paint dried.

The second recipe is perfect for a rainy day with kids! Just make a big batch, roll it out, and let the kids use your cookie cutters. You won’t have to worry if they feed some to the dog (or themselves).

Homemade Clay Beads FinishedOnce baked the finished items from both recipe are surprisingly durable. I used an emery board to sand any rough edges, applied paint to a few items, and sealed all pieces with an acrylic sealer.

Have you ever made your own clay? Do you have any clay recipes to share?

The Sirens Gear Up for October

sirens2Planning any party takes time, so it’s no surprise that many of us are already gearing up for holiday crafts and treats. Online parties require planning as well…and early invitations. After all, it takes time for word-of-mouth (or click of mouse) to go around. So, consider yourself officially invited to The Samhain Sirens’ October Extravaganza!

For those of you new to the world of The Sirens, they host an annual Halloween soiree at Samhain Sirens. It’s a month long party with recipes, craft ideas, and gifts. As I excitedly announced awhile back, I’ll be participating in this years celebration with some craft DIYs and gift items! There is still planning to do, but if you want to get a taste of the upcoming fun just pop on over to their blog–there is a little party-launch going on complete with tasty recipes and gift giveaways!