Re-Booting my Creative Life with a Creative Gift

There’s nothing like creating for others to re-boot your own creative spark.

We’ve all experienced times when life’s challenges seem to rob our energy, vision, and enthusiasm. Instinctively we know that to thrive we need to get back into our creative world, but the muse seems silent. I’ve found that when faced with these times creating a gift for a loved one or for charity raises my enthusiasm enough to follow through with the project.

I’m just now emerging from what has been a very difficult time. I knew I needed to complete a project, and that a deadline would help me follow through. Then I realized I still had time to send in an entry for this year’s Twitter Art Exhibit (TAE); that was just what I needed to get me rolling again.

Each year TAE hosts an art exhibit to benefit charity. Open to artists of all skill levels, the proceeds from sales of postcard size original artwork go directly to the charity. This year’s recipient is Pegasus, an Australian-based charity that provides horse-facilitated therapy programs for people with disabilities.

OLYMPUS DIGITAL CAMERAMy entry is entitled “I’m Pretty Too!” A common moth, noticing human pre-occupation with butterflies, wants us to remember that every creature holds its own unique beauty. When we judge ourselves according to other people’s abilities or accomplishments, we become blind to what we ourselves have to offer.

Time is growing short, but there may still be time to send in your entry. For more information, visit Twitter Art Exhibit.

Park at Dusk Fall Table-Top Decoration

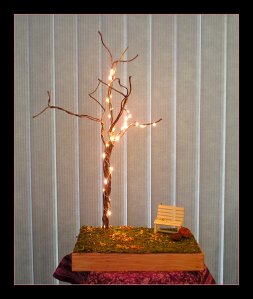
Capture the magic of an autumn evening in this table centerpiece!

Autumn Park Decoration Museiddity

Materials: Autumn Park Decoration materials Museiddity

  • Wooden Tray (for Base)
  • Moss of Your Choice for Ground Cover (I used a sheet of self-adhesive moss but did not remove the backing)
  • Brown-Paper Covered Floral Wire for Tree
  • Small Strand of Battery Operated Lights (I suggest the kind with a built-in timer)
  • Confetti or Silk Flowers to Snip (for the look of fall leaves)
  • Park Bench or Other Focal Points (Hint: look in the doll house or railroad items area at the craft/hobby store)
  • Other Ornaments of Your Choice (I added small “pumpkins” that I found in a bag of potpourri)
  • Heavy Gauge Wire Cutters
  • Heavy Duty Craft Knife or Small Saw
  • Wood Stain or Paint for Base
  • Sand Paper
  • Glue Gun
  • Clear Drying Craft Glue
  • Double Sided Tape (or packing tape folded over) to Secure the Battery Pack.

Steps:

Preparing the Stand:

An upside down tray works well for this craft as it allows you to hide the battery pack underneath. Taping the pack to the tray allows better access for changing batteries. So, the first step is deciding where you will place your tree and battery pack.

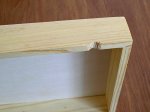
Using a small saw or knife, make a small notch in the side of the tray for the light strand to slip up into. Sand the edges of your notch. Autumn Park Decoration tray Museiddity

Stain or paint the sides of your tray.

Making the Tree:

Trees have personality, and the tree you create will set the mood for your centerpiece. The fun of making your own tree, as opposed to purchasing a pre-fabricated lit tree, is that you can make your tree as delicate or as thick and gnarled as you like! How you weave, braid, or twist the wire strands together will determine the look of the bark.

I suggest starting with three strands, each one a few inches longer that you think you will need to allow for length lost in the twisting. Braid or twist these three strands together, leaving a couple inches at each end loose for playing with roots and branches. Autumn Park Decoration tree Museiddity

Make at least three more sections like the one above.

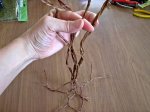
Twist and weave these sections together, using another length of wire to hold them in place. As you work, decide which end will be the roots, and which end the branches. Autumn Park Decoration trunk MuseiddityAutumn Park Decoration roots Museiddity

When working the branches, take a few strands from a neighboring section at the trunk to weave into the base of the branch.

The roots will not only stabilize the tree, but keep it from unraveling. When working the roots, think of a web. Again, use strands from neighboring sections to form the web.

Putting it All Together:

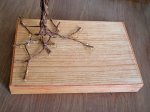
Once you are happy with your tree, use the hot glue gun to secure it to the base. You might also want to place some glue in a few crevices of your tree trunk. Autumn Park Decoration mount Museiddity

Attach the moss for ground cover.

Attach any decorative items—park bench, pumpkins, bicycles, wheelbarrows, etc…

For fall color, snip some inexpensive silk flowers into confetti-like bits. Use craft glue to secure these onto the ground cover, the park bench, etc… You might even want to place a few on the tree as un-fallen leaves. Autumn Park Decoration leaves Museiddity

Once the glue is dry, simply wrap your light strand around the tree and tape the battery box (and any extra strand) underneath. Be sure your wire is setting in the notched area.

Autumn Park Decoration final Museiddity

I made this one last October and we decided to keep it out all year. I hope you enjoy your Park at Dusk Decoration as much as we do!

Casting a Resin Replacement for a Glass Lid on a Trinket Box

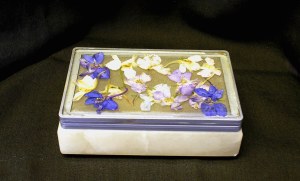
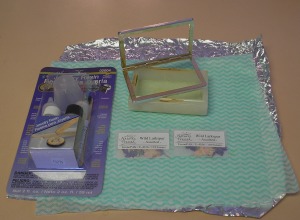
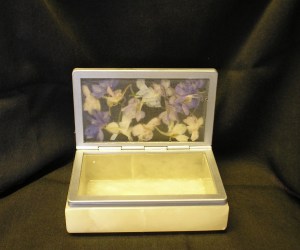
Casting Resin Lid for Trinket Box MuseiddityThe lid on this alabaster trinket box once sported a pane of beveled glass. When the original glue became discolored and brittle, the lid toppled to the floor, breaking the glass. After weighing my options, I decided to replace the missing glass with a clear, jeweler’s quality resin. As there is no “bottom” on this lid—it’s really just a frame—casting a new one required creating a false bottom to hold the resin while it cured. This same technique can be used for jewelry pendants, Christmas ornaments, sun catchers, or any situation where you would like to fill a small frame. If you enjoy working with resin, and are ready to move a tiny step beyond filling bezels, this would be a comfortable next step.

 
Materials:

  • Box Lid or Frame
  • Painter’s Tape or Masking Tape
  • Resin of Your Choice (I used Envirotex Jewelry Resin) Note: Be sure to read and follow the safety instructions!
  • Decorative Items to Embed (I used pressed flowers from Nature’s Pressed, Inc)
  • Plastic Straw (for blowing on resin to break air bubbles)

Casting a Resin Lid Museiddity

Steps:

Prepare the Frame:
Here is the box and the hinged lid; you can see where the old glue had turned brown. I removed the remaining glue with a small amount of acetone. Next, I gave the frame a fresh coat of silver paint and sealer.
Prepare the Decorative Items:
Any items that might bleed color should be sealed prior to placing in the resin. This includes printed pictures, any items with ink or dye, and dried flowers.

Paper items, such as printed designs or photos, can be brushed with two coats of white glue or Mod Podge. Pay special attention to the edges! If your pictures are not completely sealed the resin can seep in and cause blotching. You might want to use a spray sealant for dried flowers, candy sprinkles, or other fragile or awkward items.

Create the False Bottom or Backing:
There is some discussion about what types of tape work best—I even heard some people say they used contact paper. Basically, you want to choose something that will seal around the edges to hold the resin in place, but not be so sticky that it leaves behind a lot of glue. If you have masking tape at home that will work fine. Be aware that if using more than one strip of tape you will end up with ridges, which you can smooth out later. I chose to use painter’s tape, and found some wide enough to use just one piece.

Apply your tape so it is taught; take special care to burnish the edges to create a good seal.

Resin Lid Casting Museiddity

Filling the Frame:
Find a level surface where your project can rest, undisturbed, for a couple of days. Also, if you want the final product to have a domed appearance, or if you are embedding something, you may want to break this into a two step process (which means mixing the solution twice.)

For Doming—fill the frame about halfway. Let that set overnight before adding the final amount. This gives you a chance at a higher dome with less spill-over.

For Embedding—heavy items can sink to the bottom while lighter items tend to float, both can be frustrating!

For better results with heavier items, let your first application of resin set over night. The next day you can “glue” down you items with a bit of white glue. Let that dry completely. Then, add your second application of resin.

For lighter weight items such as dried flowers, you can place them in your first application of resin (you might need to push them down a couple of times—watch for air bubbles). Let that set over night; the next application of resin should cover any edges that might be too close to the surface.

When filling the frame, be sure to push the resin against the edges and into the corners. It can be thick, like honey, and might need a little coaxing to flow where you want it to go.
Keep an eye out for air bubbles while your resin cures; blowing warm air through a straw is usually enough to pop them.

Finishing:
Carefully remove the tape. Be ready for some resistance, after all, the resin has cured onto the tape—just go slow. Any tacky glue residue can be buffed off with a fine grade steel wool (#0000). To achieve a completely clear, unblemished bottom, just apply a thin layer of resin.

When I removed the painters tape from this project, I found that I actually preferred the textured appearance–it gives the underside a frosted look.

Resin Lid Casting Underside Museiddity

Here is the finished box! I used a small amount of E6000 to attach the repaired lid.

What resin projects are you planning?

Creative Spotlight: Tori O’Shea, Photographer of Storms, Nature, and the Macabre

What is your vision of the perfect life? Would you like to blend all of your favorite interests, pastimes, and talents into a profession you love waking up to? That is exactly what today’s guest is doing!

Please meet artist, photographer, and meteorologist Tori O’Shea: a fun-loving twenty-something who is combining all her favorite things into one amazing, creative life. She’ll be sharing five tips for taking up photography as a hobby, and we’ll tell you how to purchase her prints!

roofchase2WMDAbout Tori:

I am a 25 year old meteorology student. Severe weather and art have both been my passions since I was a very small child; so small, in fact, that I don’t even remember when I decided that I wanted to chase storms. It’s been ingrained in my blood since before I formed memories. At two years old, I began drawing. I was always drawing; in fifth grade I got a detention for drawing in class. At twelve, my interest in photography came about. Throughout high school I took photo classes and my passion for it was set in stone. I realized that, of course, I could fuse my love of the lens in with my love of severe weather, and I’ve been chasing storms casually for photography purposes (and for my own love of simply watching them, of course) for almost eight years; however, I’ve been chasing seriously (with the intent of paving a road to a real career) for a little under a year now. I went full-on into it last year after I met a group of local storm chasers- new friends with the same passion as mine (this was amazing, as I have been so accustomed to being the only person I’ve ever met who’s wanted to do this with love for it since early childhood- and now I have a group of amazing, talented friends with the same love- a big shout out to Bryan, Mike, Christian, Andy, Corbin, Trey, and everyone else! The list is a tad too long to include in full here, but these people really lit a fire within me and inspired me to take myself to the next level) and I haven’t looked back since. In the future, I hope to be published in Arizona Highways and National Geographic, and I hope to work for a storm tour company or, at the very least, be able to work storm chasing into how I make a living in some way. To live entirely off of my passion is my aim and major focus right now for sure.

Museiddity: Hi Tori. In your opinion, how important is creativity in regards to daily life?

Tori: It is crucial. Sure, there’s a lot of times where all it takes to get a good shot is to set your camera up, make sure the settings are all correct and get to shooting- but this won’t help you make your “good shots” interesting. Creativity is where the human element meets the technicals; how does one go about combining their technical knowledge with their desire to make a beautiful piece of work? This is where the creativity comes in; without it, everyone’s work would be similar and in no way truly their own. It is our creativity that makes us individuals, from the way we dress to the way we choose to express ourselves. Without it, we’d all simply be cogs in a machine. A boring, boring machine.

Museiddity: How has the camera lens changed your view of the world?

Tori: I’d have to say that it has made it more beautiful. I can see art and beauty in things that many people see only decay or danger in. I have a love for things like abandoned buildings and weather that can kill, a love for the darker side of human expression (like an image I 216710_10151613267710087_1534070582_nshot in an abandoned jail cell in Jerome, Arizona in which someone had spray-painted “IT WAS MORE FUN IN HELL” on the wall, or an image I shot that people continually tell me is “unsettling” of a brilliant piece of graffiti in Flagstaff of a small child staring upward at a large boulder hovering above their head), and I love it. Without the eye of an artist, I’d still appreciate beauty like any human being, of course- but I do feel that art and photography has turned an appreciation of beauty into a untitled (1 of 6)deeper understanding of why something is beautiful, even if it’s morbid or revolting. To someone else, it might be creepy, or weird, or even totally crazy, but as said by Hunter S. Thompson, “‘Crazy’ is a term of art; ‘Insane’ is a term of law. Remember that and you’ll save yourself a lot of trouble.”

Museiddity: Many of the “masters” walked that gray line! It takes courage to share uncommon visions. What message, if any, are you trying to convey through your art?

Tori: I seldom try to convey any singular messages in particular, honestly- what I try to achieve is to tell a story that begins and ends in the same image. I want it to suck you in, draw you through, and safely drop you off at the end after ruffling your hair a bit.

Museiddity: I love that last line! You stated your work has been featured in a tattoo? There must be a story behind that!

Tori: Oh man! That IS a funny story in the sense that it was so unexpected; my senior year of high school, I was at Denny’s with a group of friends and I was drawing (as usual) on a napkin. It was the only thing available. Well, when I was younger (and admittedly, still now) I was a fan of a morbid cult comic book series called Johnny the Homicidal Maniac; in one particular issue, the main character says the phrase “Immortalize the moment!” while brandishing a pair of large knives at his date (I know, I know, don’t judge). I drew a machete-style knife with that phrase embedded in it, and set the napkin aside to draw on another one. I didn’t think much of it at all until my friend Matt showed me that he’d gotten that napkin drawing tattooed! He liked it so much that he put it on his body permanently- how cool is that?

Museiddity: Wow, I can’t even imagine how you felt when you saw that! Thank you for sharing your thoughts with us today. IMG_0251WMD

Tori’s Five Tips for Taking Up Hobby Photography:

1. Learn, learn and learn some more. I can’t state this enough. If you know the ins and outs of how your camera works, what each setting is and how it relates to each other setting, it will absolutely make all of the difference in your final work.

2. Once you’ve learned about the technical aspects- practice them! You can ace every test in your photography class, but without actually going out and working through real-life scenarios in studio and on site, you’ll never really know anything despite having learned it.

3. Watch your ISO. This is your film speed (in both digital and film photography), and it is one of the factors that determines how sensitive your lens is to light. This ties in with the above two, but for me, it’s worth mentioning alone. I call myself the queen of noise- many of my final images have a flaw, at least to me: they’re noisy! You ever notice the dull but colorful “fuzz” in some photos that were taken in low light? That’s noise, and with many of my weather images having been shot at night, I’m still learning about reducing noise. One of the major keys is to work on a low ISO and adjust your other settings to compensate for the slow “film” speed. Sure, you might have to finagle it a bit, but once you’ve nailed your ISO settings- it makes an enormous difference.

4. Always. Carry. A spare. SD card. Always. Carry it in your camera bag, or anywhere that isn’t inside your camera. Seriously. This is probably the most important tip I can give from personal experience. One time, I drove 45 miles out into the nothingness of the desert for a beautiful lightning storm only to be infuriated to discover my SD card was not in my camera. A few of my friends jokingly bought me several extra cards that year as a gift. Thanks, guys.

5. Always, always, always make sure your battery is charged. Always!! You never know when you’ll be on the move and you’ll need your camera. There’s nothing more disheartening than discovering your battery has 14% juice left and you’re shooting a wedding for the next five hours.

Connect with Tori O’Shea on Facebook
View her art at DeviantArt and RAW Artists
Buy Prints: To purchase Tori’s art, just contact her through Facebook or email her at copperstatestormchasing[at]yahoo.com.

Easy Burlap Wreath with Corsage Style Ornaments

Burlap or jute wreaths are so easy to make! You can dress them up, or leave them casual–and decorate them for any season. Here are examples of my two most recent creations, along with the steps so you can hang one on your door today.

 Mother's Day Wreath by rlc

This one was made for Mother’s Day.


Autumn Burlap Wreath by RLCThis one was a “No-Sew, No-Glue” burlap wreath makeover. I wanted something more full.


Materials:

Wreath Form
Burlap or Jute Garland (or your former No-Sew Wreath)
Ribbon (optional)
Floral Wire
Wire Cutters
Corsage Style Ornaments (instructions posted on October 16, 2014)

Steps:

Prepare your materials:

Garland and Ribbon:

Decide how many strips of material you will want to use; the one pictured has three strips of burlap and one strip of decorative ribbon. To measure the length needed for each strip, hold the material against the outside edge of your wreath form and wrap the material around it at least 1 ½ times. This will give you enough extra fabric to “poof.”

Floral Wire for Securing Garland:

Measure out a few strand of wire to be readily available. Basically, these just need to be long enough to wrap around the thickness of your wreath form. Give yourself enough extra to allow for easy twisting of the ends—you can trim off any excess once the wreath is finished.

Create Your Wreath:

I began by taking apart my original wreath; this was easy as I created it with the idea of changing it with the seasons—it was just a matter of untwisting some wire. I’ll be using the same process to make this new version.

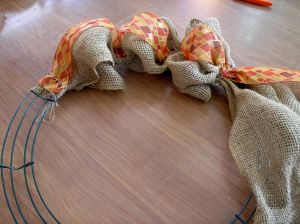
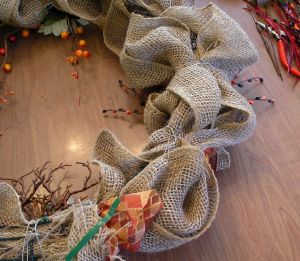
Gather the ends of your fabric strips, hold them against your wreath form, and secure with a wire twisted in the back like a twist tie. Autumn Burlap Wreath Start rlc

Now it is just a matter of playing with the fabric; securing it at the end of each section with a twisted piece of wire.


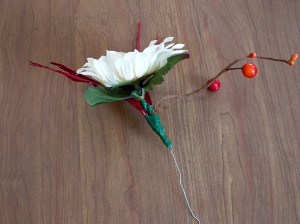
Once you’ve finished the body of your wreath, it’s time to add your decorative elements. I’ve used some corsage-style bouquets created by taking apart elements of floral stems and re-securing them with florist tape. These little bouquets are on florist wire. To attach, simply place the bouquet against your wreath, between two of the “poofs,” and wrap the wire stem around the wreath. Finish by bringing the end of the wire back around your bouquet and pinch it closed. Floral Tape Tutorial 006 rlc


Take a good look at your wreath—play with the fabric, adjusting the “poofs” so they cover the twist ties. Once you are happy with the result, turn the wreath over and trim off any excess wire. Autumn Burlap Wreath Back rlc

Combining Materials with Floral Tape

Floral Tape Tutorial 001 rlc

Let’s say you want to use one silk flower, a few feathers, and a seed pod to create a pick for a potted plant or a decoration for a wreath, how would you do that? Or, what happens when you don’t want to use all of the stems in silk bouquet, or you want to combine parts of several bouquets into one? One solution is to use floral tape. If you’ve ever purchased a corsage, this is what the florist used to piece those elements together.

I’m reworking my burlap wreath for autumn. I have several elements I’d like to include, but I want to use only parts of the stems I picked up at the craft store. Also, some of the elements are too long for my purpose. I’m going to take these decorations apart and make my own little arrangements.

Materials:

Wire Cutters
Scissors/craft knife
Floral Tape
Floral Wire
Flowers, Feathers, and Decorations of your choice.

If you look closely you’ll notice the original items are formed by taping several stems together. I’m simply going to take them apart, and create new decorations following the same principle. To take the stems apart you can use a craft knife to pierce the tape and then pull the stems in a downward motion to separate.

Floral Tape Tutorial 002 rlc


Floral Tape Tutorial 003 rlc


Next, decide what elements you want to include in your new decorative stems. Play with the lengths of the pieces. Hold them all together and see how they fit. Trim anything that is too long. Since my decorations will be wired onto a wreath I will need all the stems trimmed and the flowers and feathers taped onto flexible wire.

Once you’ve decided on the arrangement, it’s time to build each component. The tape needs to be touching each stem; if you simply hold the bundle together and wrap tape around it you’ll have items in the middle falling out.

Start with any items that now need wire stems such as flower heads or feathers. Cut a piece of florist wire, hold the flower head or feathers against the wire, and wrap the floral tape around the stem for one full turn, then continue to twirl your new stem around while spiraling the tape down the length of the stem until it feels secure. Repeat this for each small section of your new decoration. Floral Tape Tutorial 004 rlc

When each small section is ready, take your center flower and one other section and wrap them together with the tape. Add a third section and graft that onto the stem. Continue until all elements are combined. You only need one main stem, so trim away some of the wires and continue wrapping so that the sharp edges are covered. Floral Tape Tutorial pic


You now have your own unique decorations to use in wreaths, over doorways, wrapped around candle holders, etc…

Floral Tape Tutorial 006 rlc  Floral Tape Tutorial 007 rlc

Come Play with the Sirens!

October is here, which means its time to head the Siren’s call to celebrate Halloween/Samhain/Harvest Time. Each year Samhain’s Sirens orchestrate a month long virtual party and everyone is invited; they share legends, recipes, music, crafts…and everyday they give away handmade gifts! ss12


Join me today to learn how to make a Remembrance Wreath—a leaf for every loved one passed. We’re giving away a kit to get you started on making your own wreath! While you’re there, don’t forget to check out the previous posts for yummy recipes and other fun. Remembrance Wreath Finished by rlc

Craft Pumpkin Punkin Sprite

Punkin Sprite Decoration by rlc

I’m sure you’ve heard of woodland sprites, but did you know there are sprites in your vegetable garden? Unlike the Woodland Sprites, Punkin Sprites only visit this dimension during the time of the last harvest. Once the last pumpkin is picked, and the last row of corn is harvested, Punkin Sprites go back to their home.

Happy and playful, Punkin Sprites sing songs to make pumpkins and other squash grow big—in fact, they are a bit competitive, but it’s all in fun! Celebrate the joy of autumn by making your own little Punkin Sprite!

Materials:

Craft Pumpkin
Beads or Buttons for eyes
Silk Flowers or Moss for eyebrows and hair
Craft Paint and Sealer
Epoxy Clay of your choice *See notes on working with epoxy clay
Protective Gloves—craft/hospital/work gloves
Pop-Up Cleansing Cloths
Adhesive or Glue Gun
Wax Paper to protect work station while working with epoxy clay
Craft Knife
Awl or Skewer
Paint Brushes or Foam Brushes
Pencil

Preparation:

Prepare your work surface by placing wax paper on your table to protect it from the epoxy clay.

If unfamiliar with epoxy clay, please read notes at the bottom of this post.

(Clay dries quickly; when making the eyes, nose, ears, etc… mix only enough clay for one item at a time.)

Step One—Making a Face

Begin by marking placement for the eyes, nose, ears, and mouth. Once you have decided on the placement, lightly score the pumpkin to ensure a good epoxy adhesion.

Beginning with the ears, mix a small amount of Part A epoxy with equal amount of Part B. work the two parts together until pliable and tacky. Form this into the desired shape for the ear and press it into place. Make any adjustments needed to the shape and set the pumpkin aside. Repeat for the second ear. Punkin Sprite Ear by rlc

For the eyes, you’ll be making three parts. One is the foundational piece or back of the eye into which you will press your bead or button. Then you will make an upper and lower eyelid to help keep the bead in place.

Mix a small amount of clay and smooth out into a flat, almond shape. Press that onto the pumpkin. Press your bead or button into the clay.

Punkin Sprite Eye by rlc  Punkin Sprite Eye Lid by rlc


Next, mix a small amount of clay and separate it into two parts. Roll each into a small tubular shape to go just along the upper and lower lid area on the eye. You want it to cover the bead just a little bit to help keep the bead in place. Work the eye until you like the result. If any clay gets on the bead you can use a cotton swap dipped in soapy water or alcohol to remove the residue.

To make a nose, mix up a small amount of clay and work it into a ball or tube shape. Press this onto the pumpkin, smooth down the edges to blend into the face and finish forming a nose.  Punkin Sprite Nose by rlc

Form the mouth by molding the clay into the basic shape you want, pressing this onto the pumpkin and molding the lips into shape with your thumb and forefinger. Be sure to smooth the edges onto the pumpkin so the mouth looks like it is part of the face, like you did with the nose.

Once all your facial features are in place let them cure for at least twenty minutes.

Step Two—Painting

At this point your pumpkin and your clay are probably different colors. Before painting the features of your Punkin Sprite, I recommend an all-over base coat in a light color such as Onion or Mushroom. This will help your painted features to be more uniform in color. Punkin Sprite Base Coat by rlc

Once the base coat is dry, continue to paint the face and ears. Once finished be sure to seal the paint with the appropriate sealer. Punkin Sprite Painted by rlc


Step Three- Hair, Eyebrows and other Accents

How you attach your Sprite’s hair and eyebrows depends on the materials you are working with. For instance, I wanted to work with silk stems. To get the look I wanted for the hair I punctured the pumpkin at the stem and used a skewer to enlarge the hole. I then applied a bit of craft adhesive (you can use your favorite craft glue or a hot glue gun) and inserted the stems. The eyebrows are simply leaves from the same silk stem, cut to length and glued on.

My Punkin Sprite by rlc

Give your Sprite even more personality with a hat or other accessories!

*Notes—Epoxy Clay

Epoxy clay (or two-part epoxy adhesive) can be found in craft stores by the jewelry supplies or at your local hardware store by the plumbing supplies. They work the same way but have different textures and curing times…and smell. The jewelry clay is smooth and warms quickly in your hand. It has a longer work time and a better smell. You can expect to pay about $12.00 for two 1.6 oz tubs (parts A & B). Plumbing clay has a more granular texture and an industrial-type smell, you can expect to pay about $6.00 for a 2 oz tube containing both A & B. In my example, I used plumbing epoxy for the ears and jewelry epoxy for the other features.

Epoxy clay dries quickly and once it is dry it is pretty much permanent, so please protect your table…and floor!

Gloves are recommended as the clay may irritate skin. Keep some cleansing cloths nearby to wipe off hands and any tools you use.

Fall is Coming…!

Have you started on your Fall crafts? I’ve been buried in other work but am really looking forward to getting crafty again! I have an idea for a harvest/Halloween centerpiece I’ve been wanting to start on–somehow it’s just easier to get out the glue gun when it isn’t 110 degrees outside!

Speaking of Halloween, I’ll be at Samhain’s Sirens again this yeass12r with a Fall/Harvest craft to share! I can’t say too much, but this year’s craft has to do with your family tree. Their are 50 days left until Halloween, but these gals start the party on October 1st! My date is October 11th–then I can share the craft with you!

Speaking of sharing, what are you working on?

One more week of Summer–yay! I’ll be back in Autumn.